> ## Documentation Index
> Fetch the complete documentation index at: https://funnelfox.com/docs/llms.txt
> Use this file to discover all available pages before exploring further.
# FastSpring
> Integrate FastSpring as your payment provider in FunnelFox. Step-by-step setup for web subscriptions, checkouts, and recurring billing.
FastSpring is an all-in-one merchant of record and payment integration for FunnelFox that provides global
payment processing and subscription management.
## Key features
The FunnelFox integration with FastSpring supports the following payment
methods and transaction types:
| Transaction type | Cards | Apple Pay | Google Pay | PayPal |
| ------------------------------ | :---: | :-------: | :--------: | :----: |
| **Subscriptions** | | | | |
| Subscriptions | ✅ | ✅ | ✅ | ✅ |
| Free & paid trials | ✅ | ✅ | ✅ | ✅ |
| **Upsells** | | | | |
| One-time products | ✅ | ✅ | ✅ | ✅ |
| Subscription upsells (2nd sub) | ✅ | ✅ | ✅ | ✅ |
| **Offers** | | | | |
| Intro offers | ✅ | ✅ | ✅ | ✅ |
Learn more about [configuring each transaction type](/docs/integrations/payments/fastspring#subscription-configuration) in your funnel.
## Setup
You need an active FastSpring account to integrate with FunnelFox.
Keep both FunnelFox and FastSpring dashboards open during setup—you'll
switch between them several times.
### 1. API keys
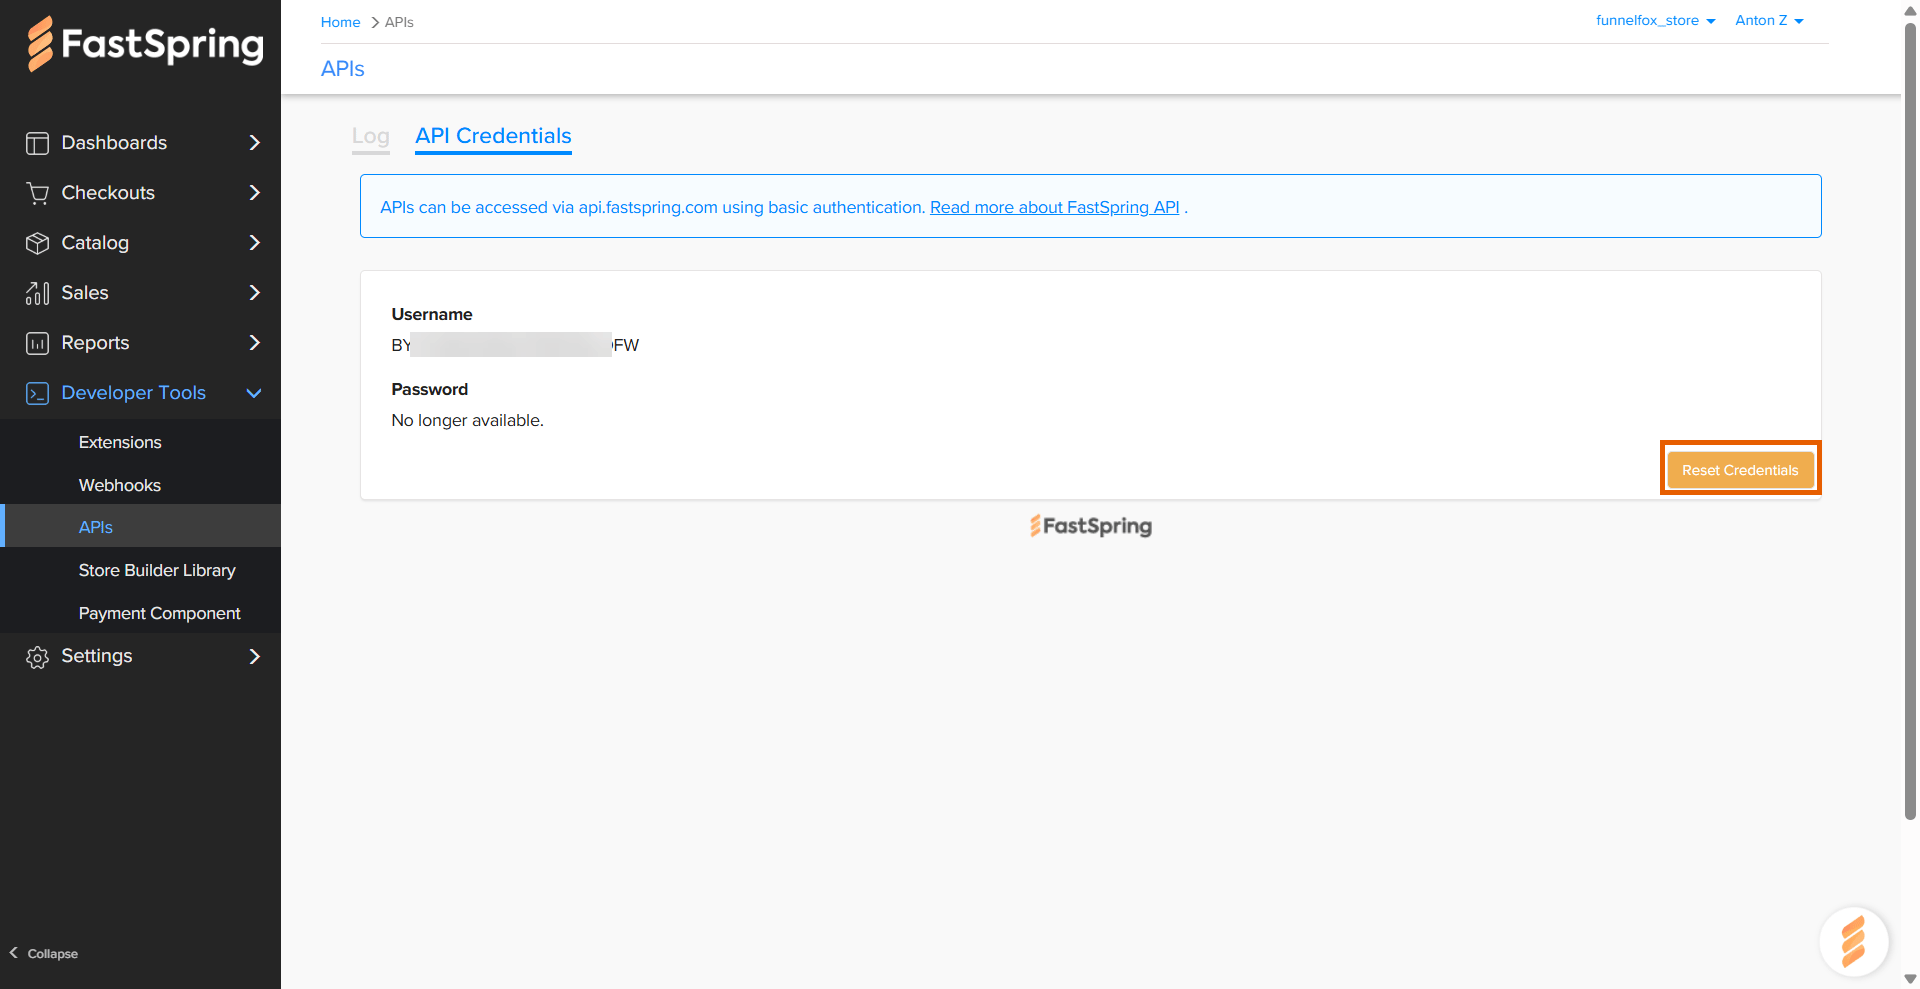
1. Go to **Developer Tools > APIs > API Credentials** in
[FastSpring](https://app.fastspring.com/).
2. Click **Create** or **Reset Credentials** to get your API Username and
Password.
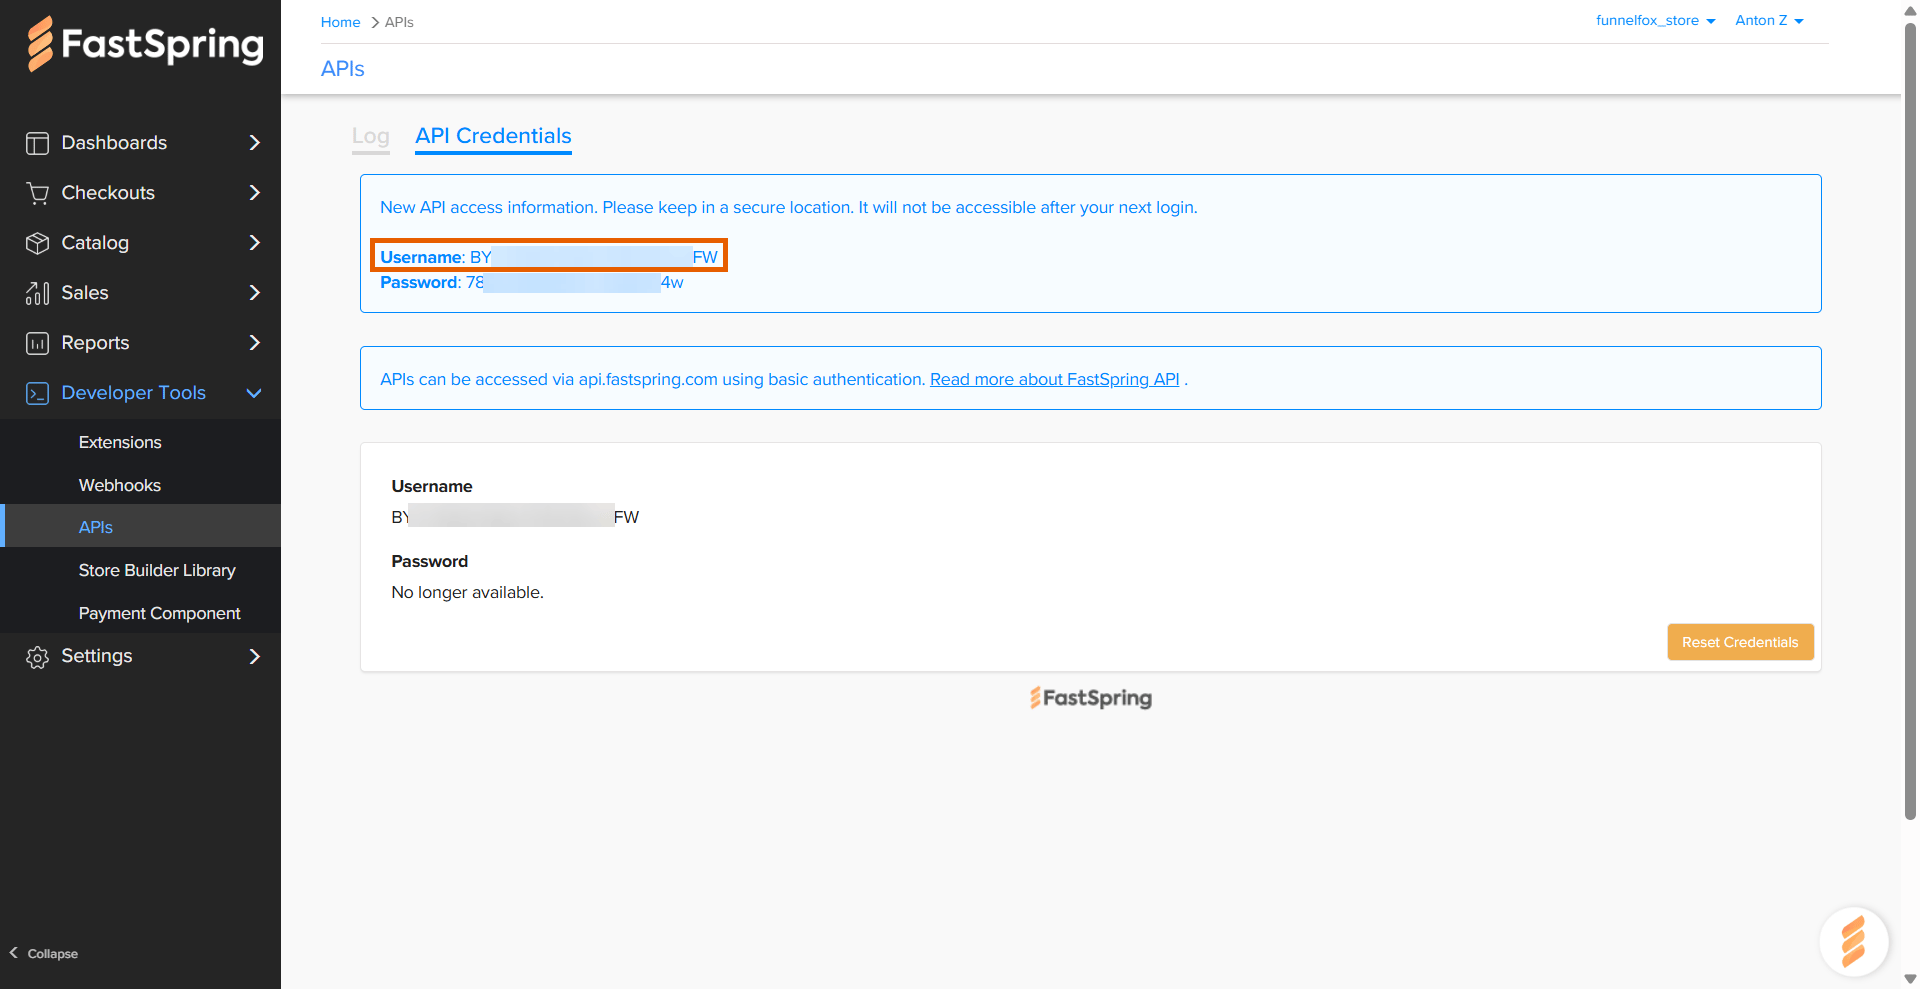
 3. Copy your **Username**.
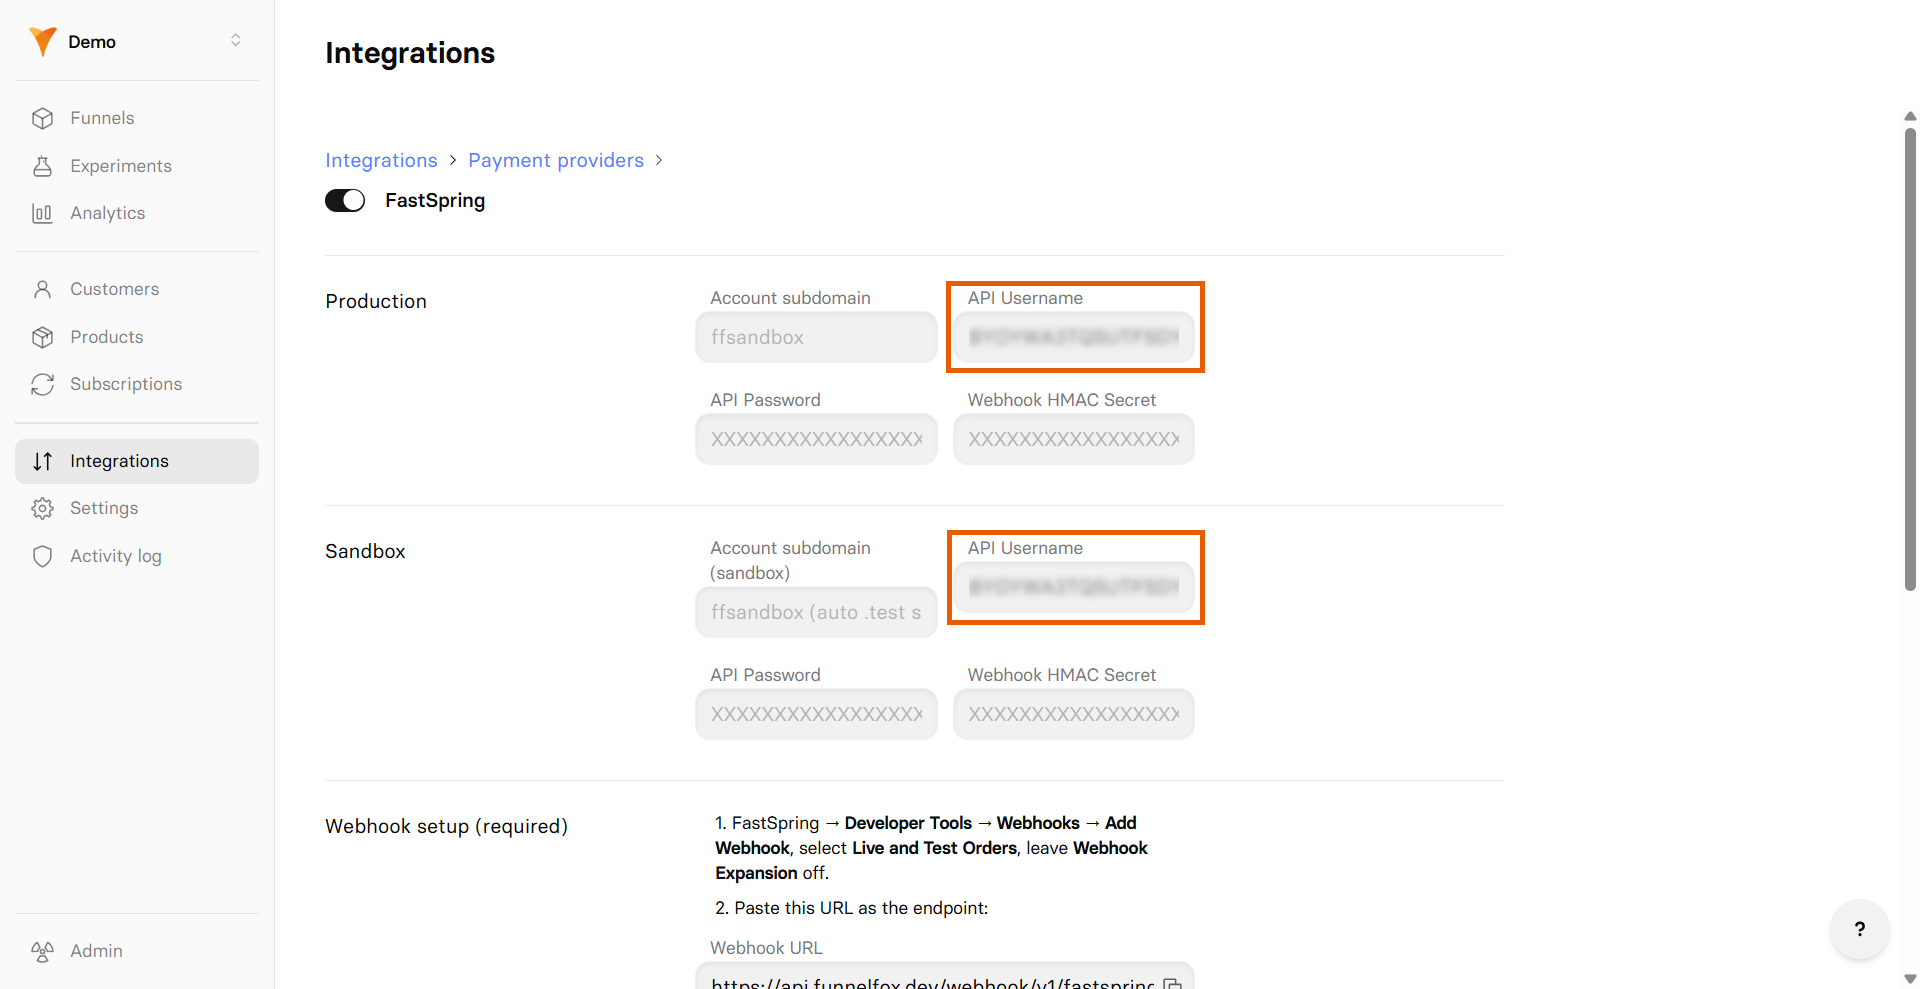
 4. Go to **Integrations > FastSpring** in FunnelFox.
5. Paste your Username into the **API Username** fields under both
**Production** and **Sandbox** sections.
4. Go to **Integrations > FastSpring** in FunnelFox.
5. Paste your Username into the **API Username** fields under both
**Production** and **Sandbox** sections.
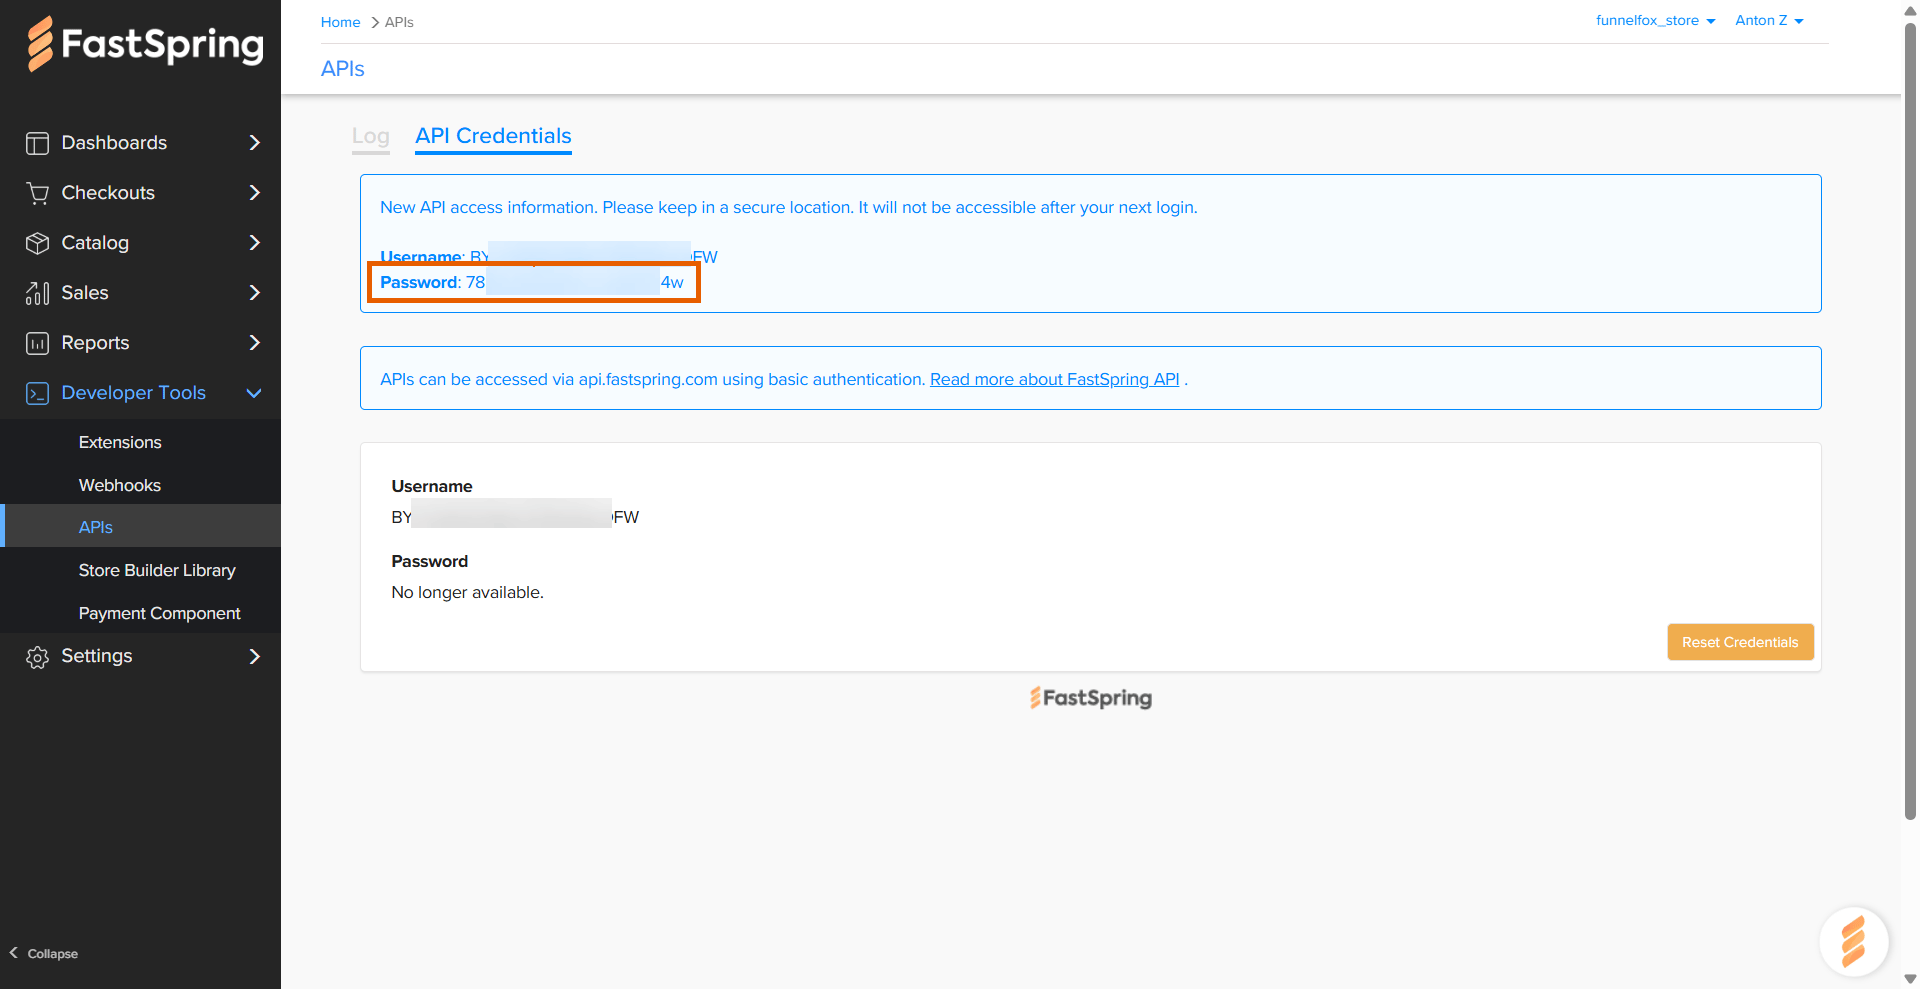
 6. Go back to your credentials in FastSpring and copy your **Password**.
 7. Paste your Password into the **API Password** fields under both
**Production** and **Sandbox** sections in FunnelFox.
7. Paste your Password into the **API Password** fields under both
**Production** and **Sandbox** sections in FunnelFox.
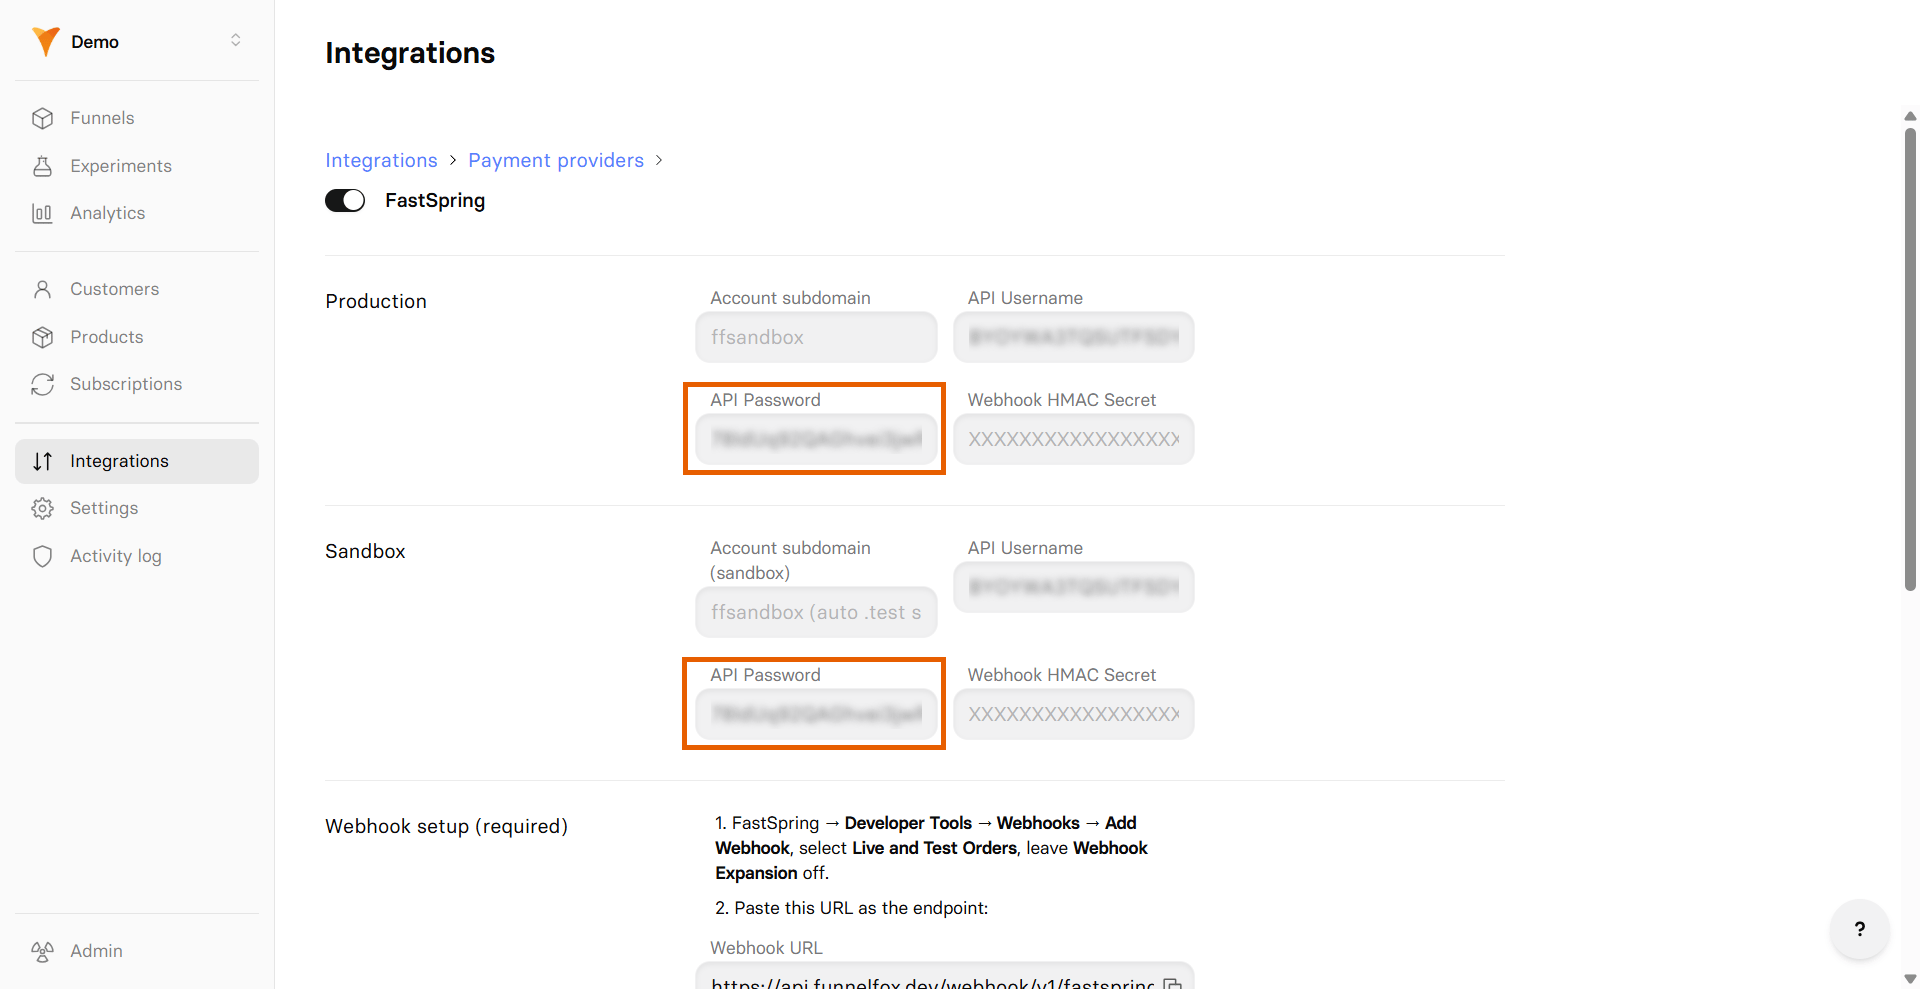 Don't close your FastSpring integration settings in FunnelFox and proceed with the next section.
### 2. Webhook keys
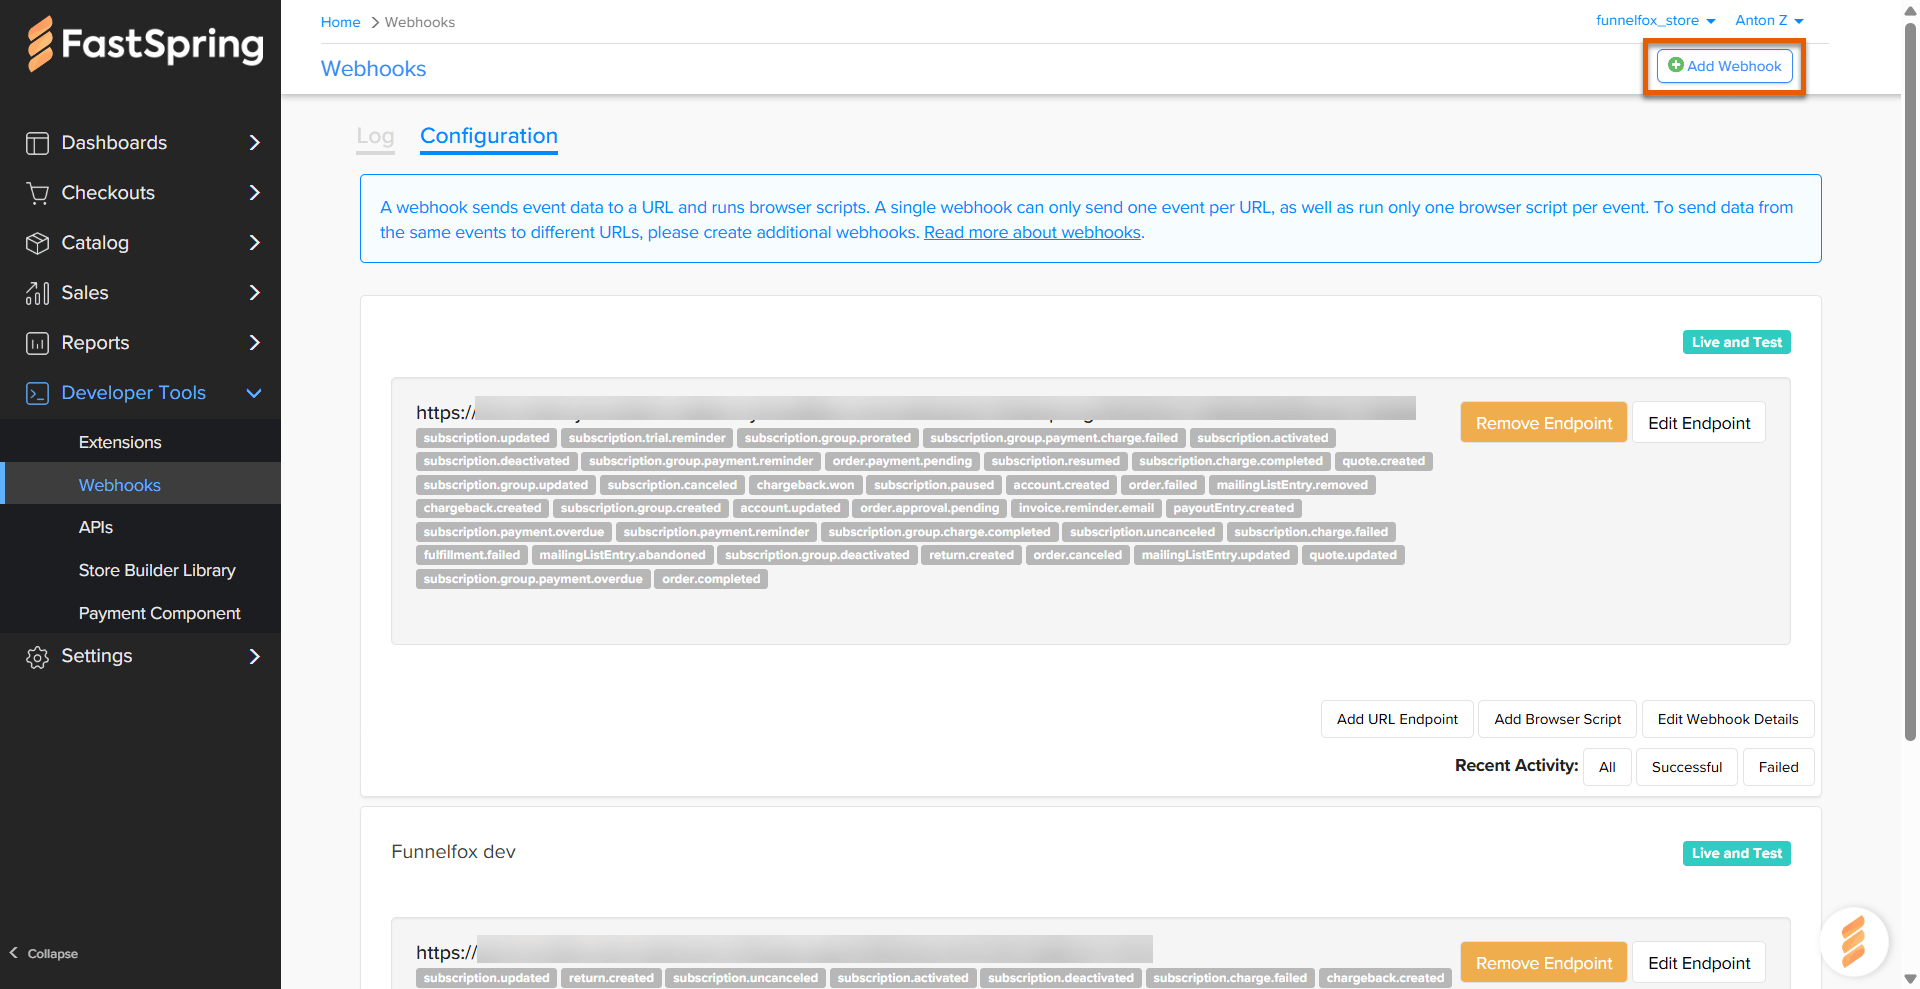
1. Go to **Developer Tools > Webhooks > Configuration** in FastSpring.
2. Click **Add Webhook**.
Don't close your FastSpring integration settings in FunnelFox and proceed with the next section.
### 2. Webhook keys
1. Go to **Developer Tools > Webhooks > Configuration** in FastSpring.
2. Click **Add Webhook**.
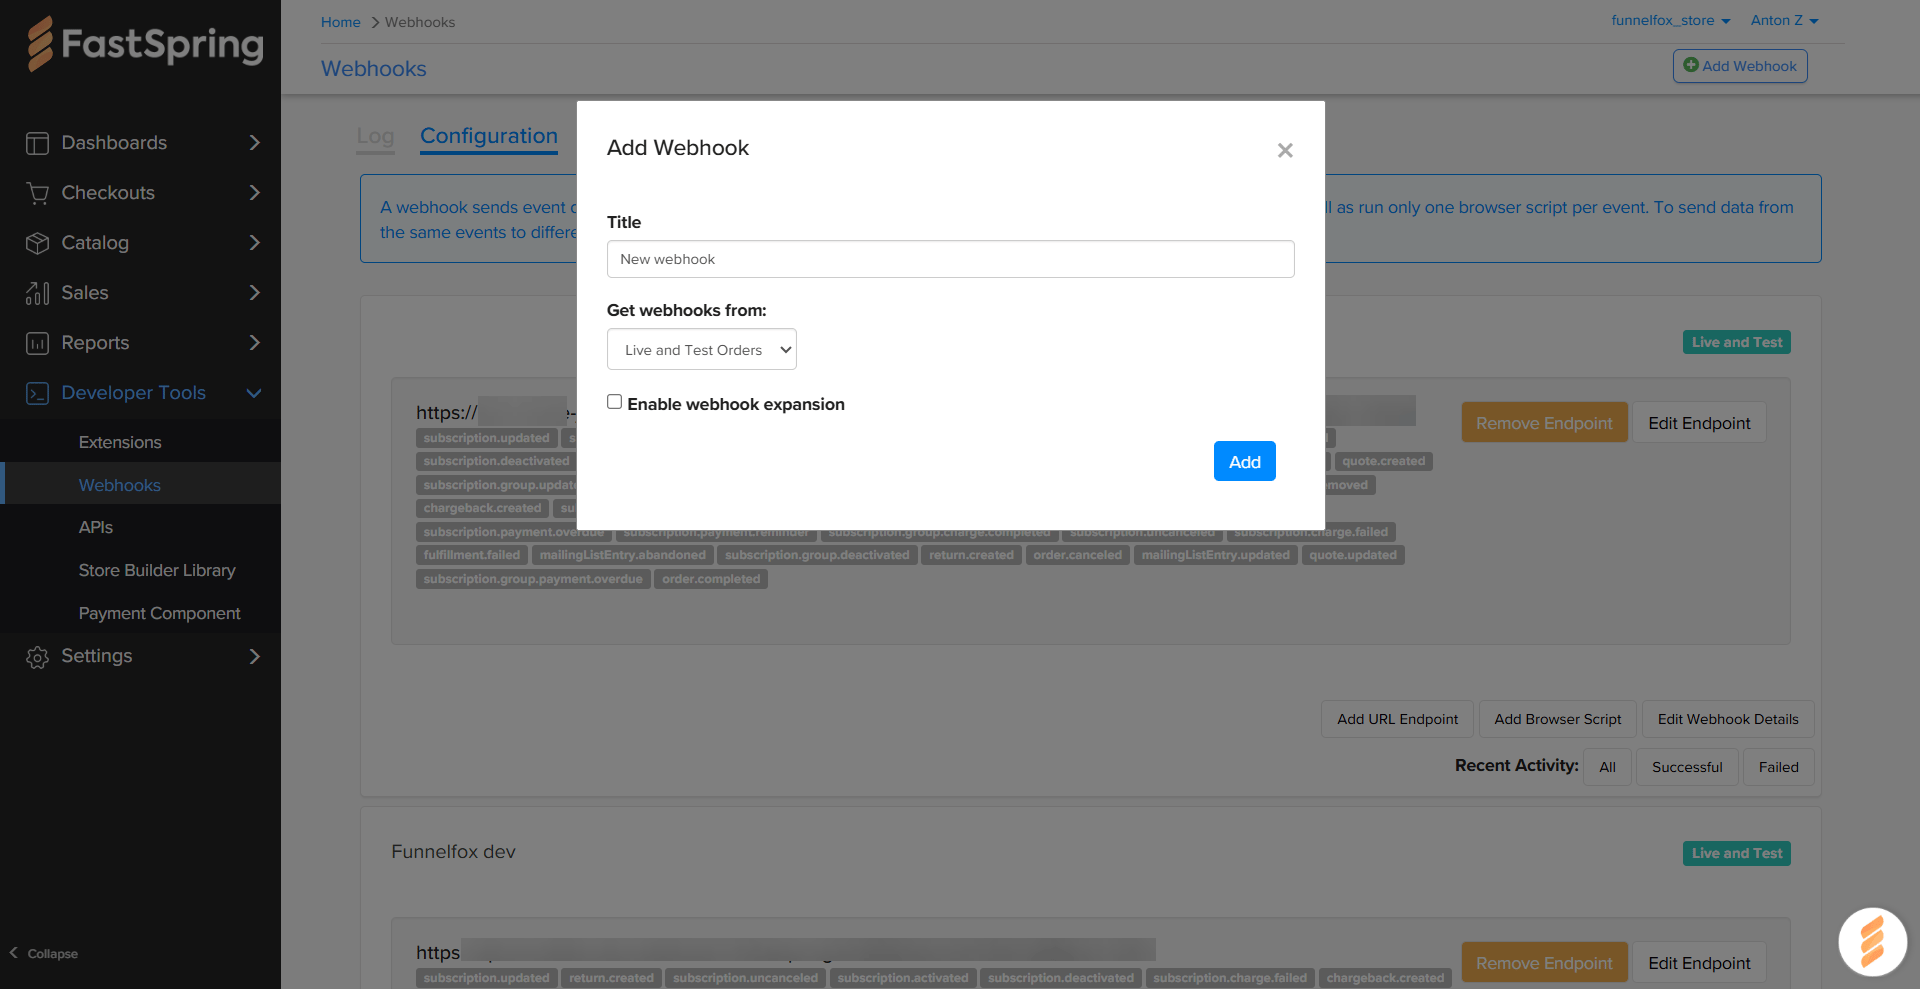
 3. Configure the webhook and click **Add**:
* **Title**: Name your webhook.
* **Get webhooks from**: Live and Test orders.
* **Webhook expansion**: Keep disabled.
3. Configure the webhook and click **Add**:
* **Title**: Name your webhook.
* **Get webhooks from**: Live and Test orders.
* **Webhook expansion**: Keep disabled.
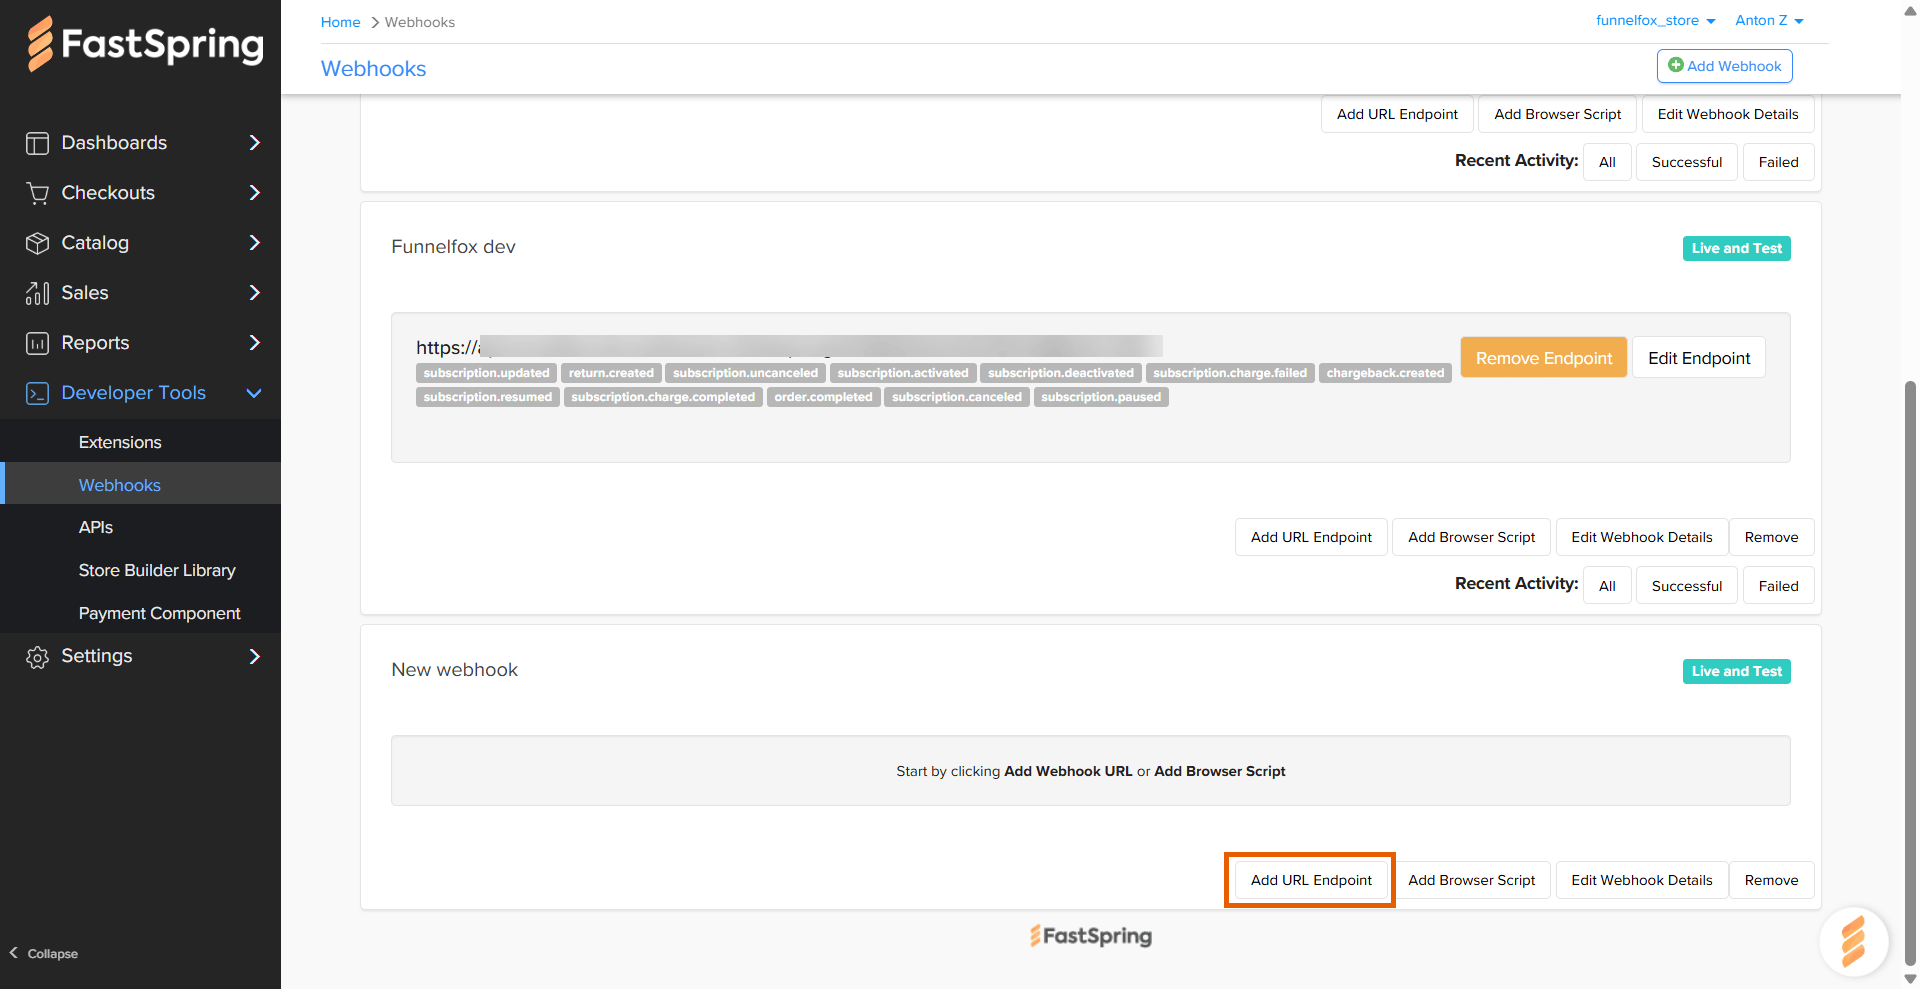
 4. Click **Add URL Endpoint** on the webhook you just created.
 5. Go back to your integration settings in FunnelFox and copy your
**Webhook URL**.
5. Go back to your integration settings in FunnelFox and copy your
**Webhook URL**.
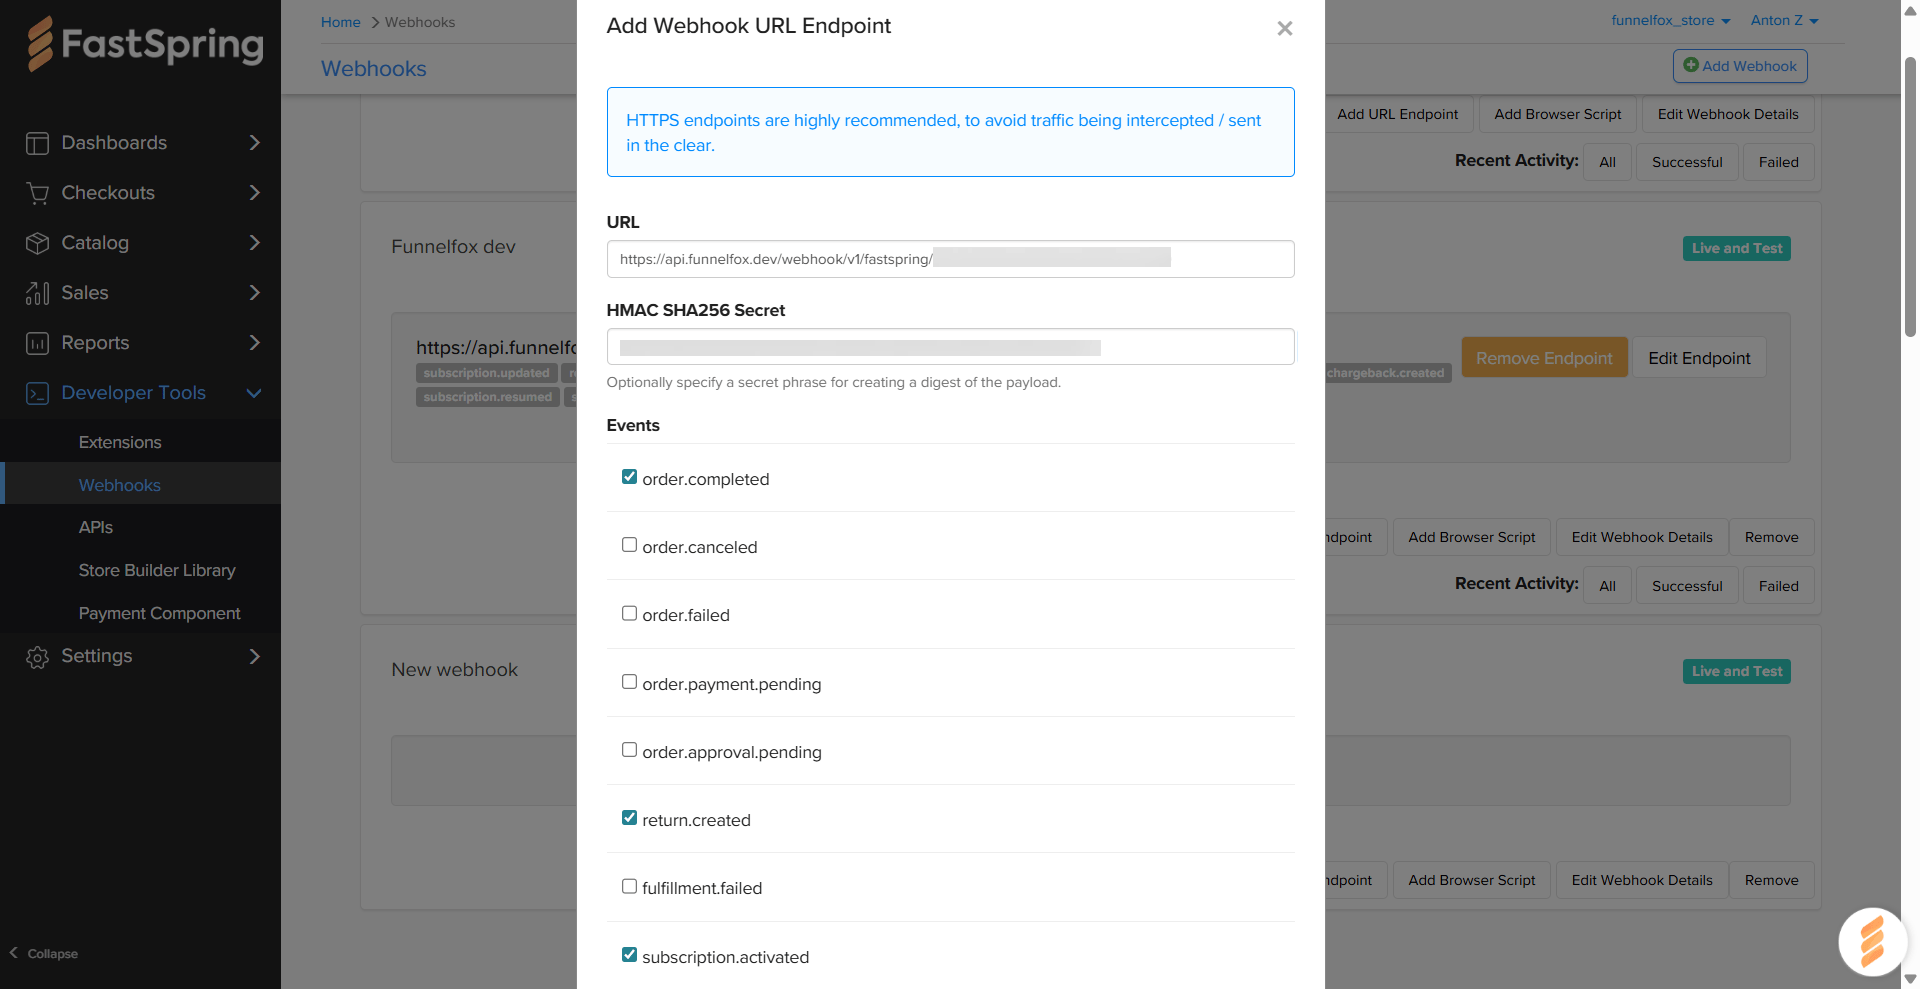
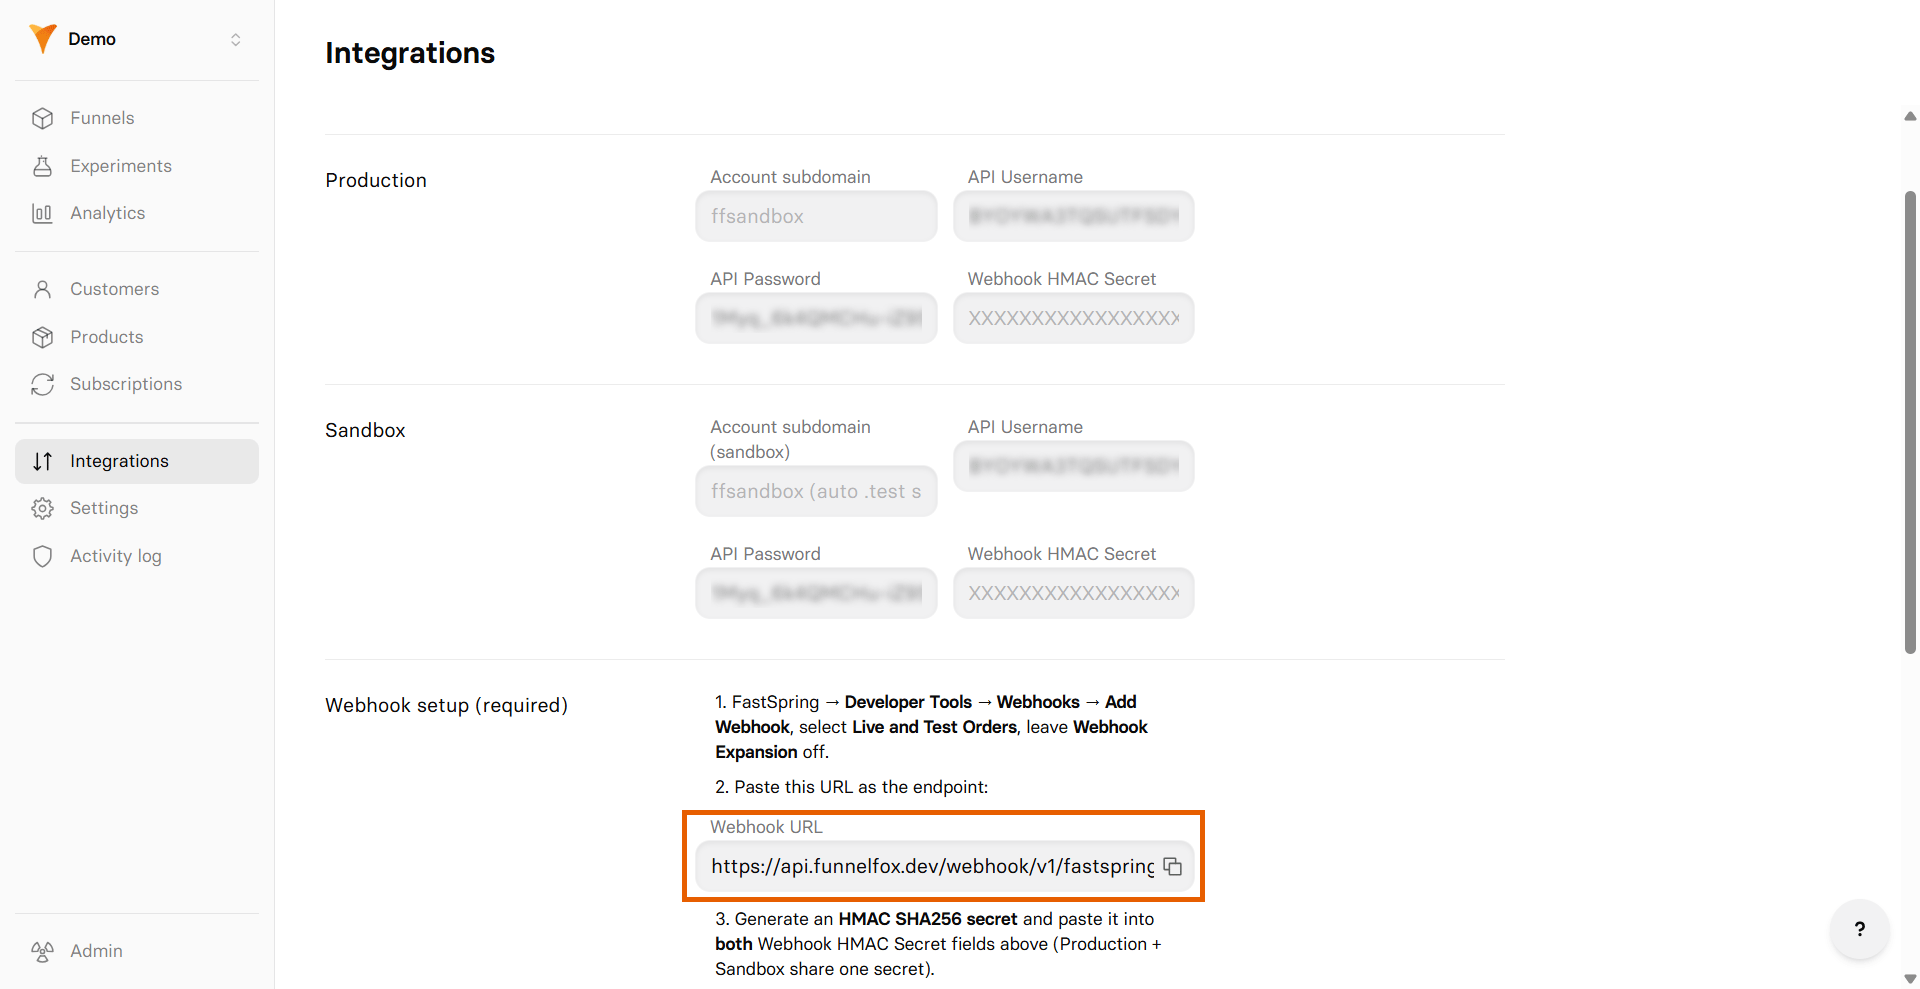 6. Proceed with webhook configuration in FastSpring and click **Add**:
* **URL**: Paste your webhook URL from FunnelFox.
* **HMAC SHA256 Secret**: Generate your own webhook secret and paste
here. Keep your secret saved — you'll also need it later in
FunnelFox.
You only need one secret. The same secret is used for both sandbox and production setups.
* Select the following **Events**:
* `order.completed`
* `subscription.activated`
* `subscription.canceled`
* `subscription.deactivated`
* `subscription.updated`
* `subscription.uncanceled`
* `subscription.charge.completed`
* `subscription.charge.failed`
* `subscription.paused`
* `subscription.resumed`
* `return.created`
* `chargeback.created`
6. Proceed with webhook configuration in FastSpring and click **Add**:
* **URL**: Paste your webhook URL from FunnelFox.
* **HMAC SHA256 Secret**: Generate your own webhook secret and paste
here. Keep your secret saved — you'll also need it later in
FunnelFox.
You only need one secret. The same secret is used for both sandbox and production setups.
* Select the following **Events**:
* `order.completed`
* `subscription.activated`
* `subscription.canceled`
* `subscription.deactivated`
* `subscription.updated`
* `subscription.uncanceled`
* `subscription.charge.completed`
* `subscription.charge.failed`
* `subscription.paused`
* `subscription.resumed`
* `return.created`
* `chargeback.created`
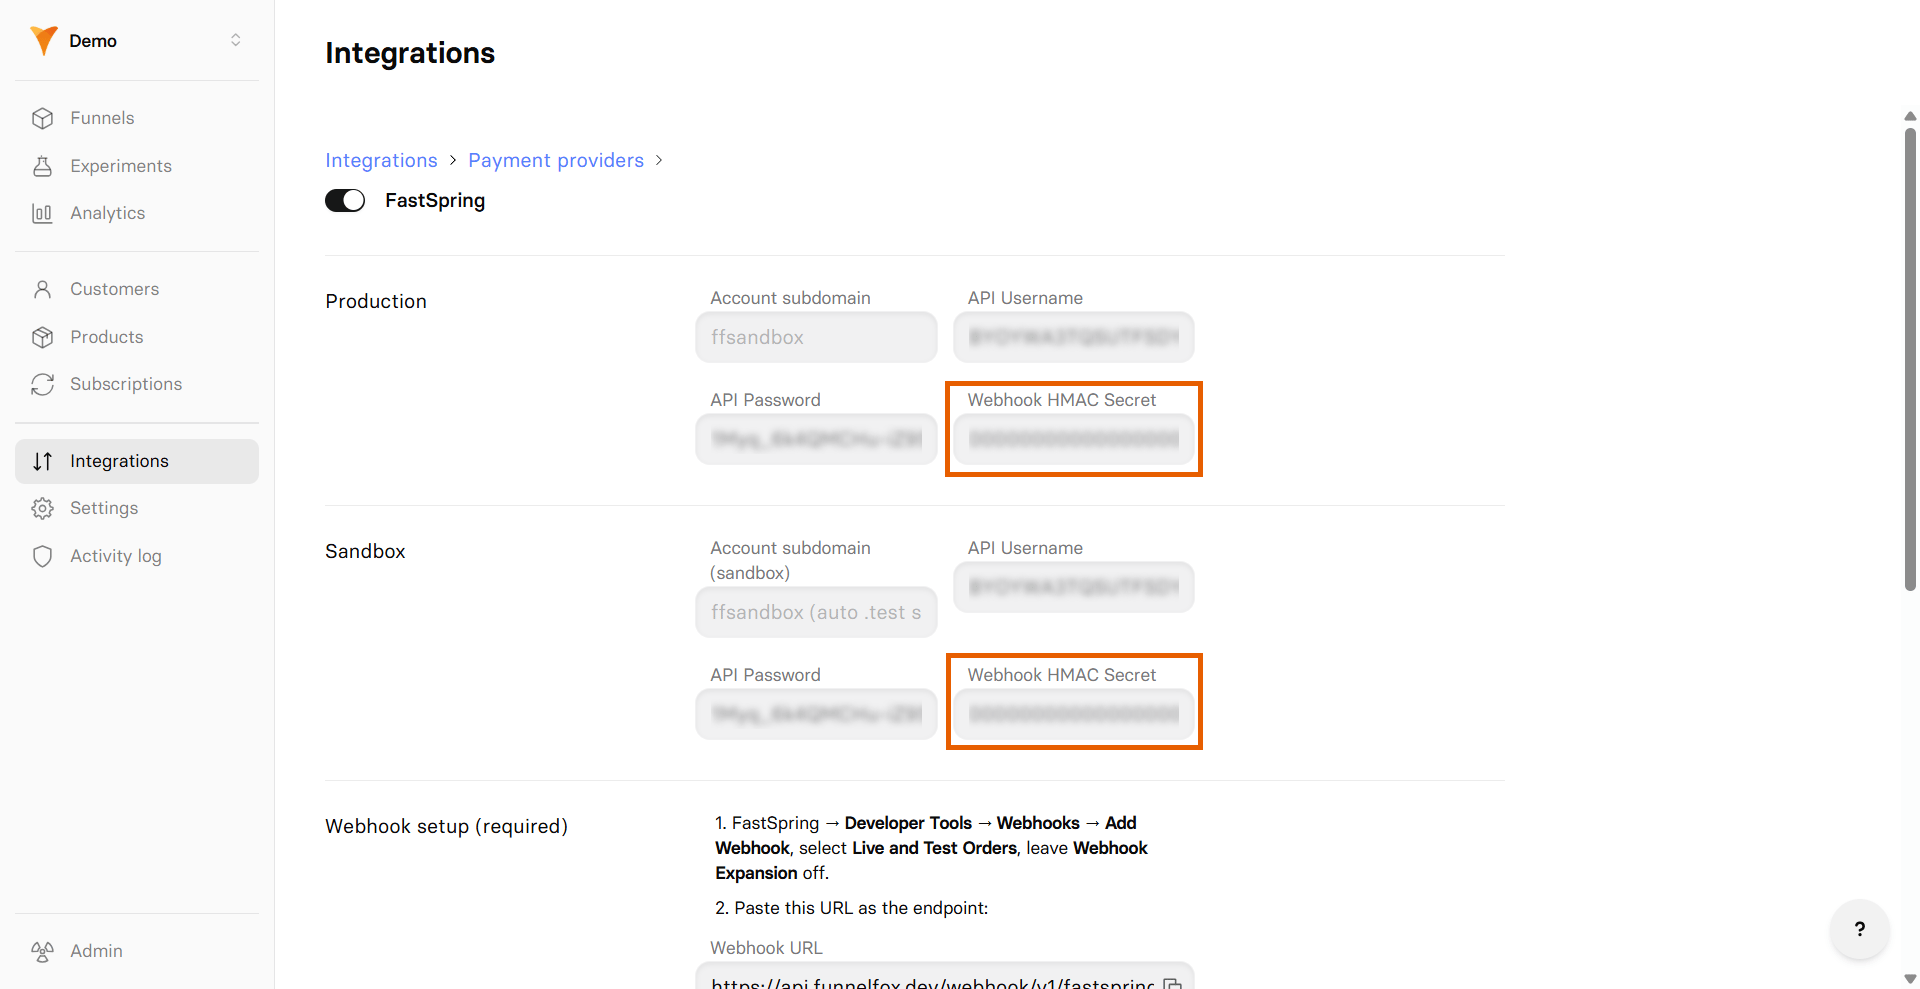
 7. Go back to FunnelFox and paste your webhook secret into the
**Webhook HMAC Secret** fields under both **Production** and
**Sandbox** sections.
7. Go back to FunnelFox and paste your webhook secret into the
**Webhook HMAC Secret** fields under both **Production** and
**Sandbox** sections.
 ### 3. Domains
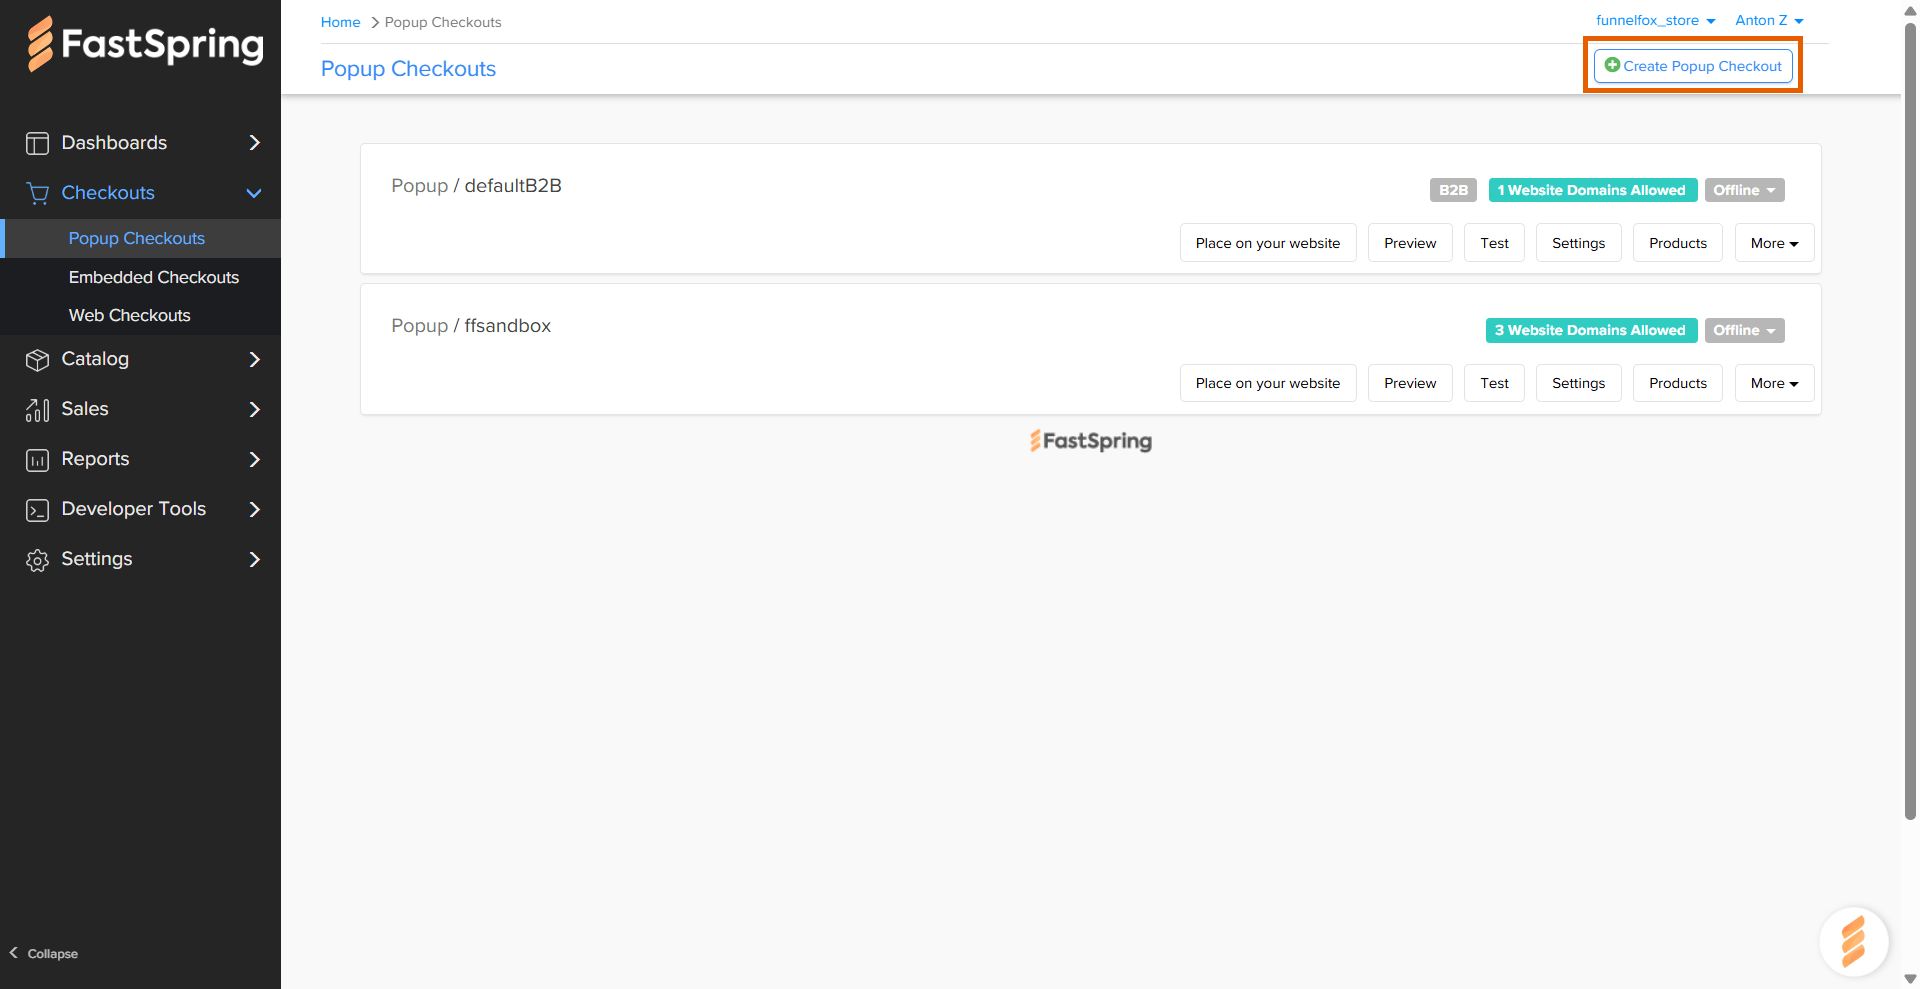
1. Go to **Checkouts > Popup Checkouts** in FastSpring.
Based on the checkout type needed, you can proceed with Embedded checkout instead. Learn about [Checkout types](/docs/integrations/payments/fastspring#checkout-types).
2. Click **Create Popup Checkout**.
### 3. Domains
1. Go to **Checkouts > Popup Checkouts** in FastSpring.
Based on the checkout type needed, you can proceed with Embedded checkout instead. Learn about [Checkout types](/docs/integrations/payments/fastspring#checkout-types).
2. Click **Create Popup Checkout**.
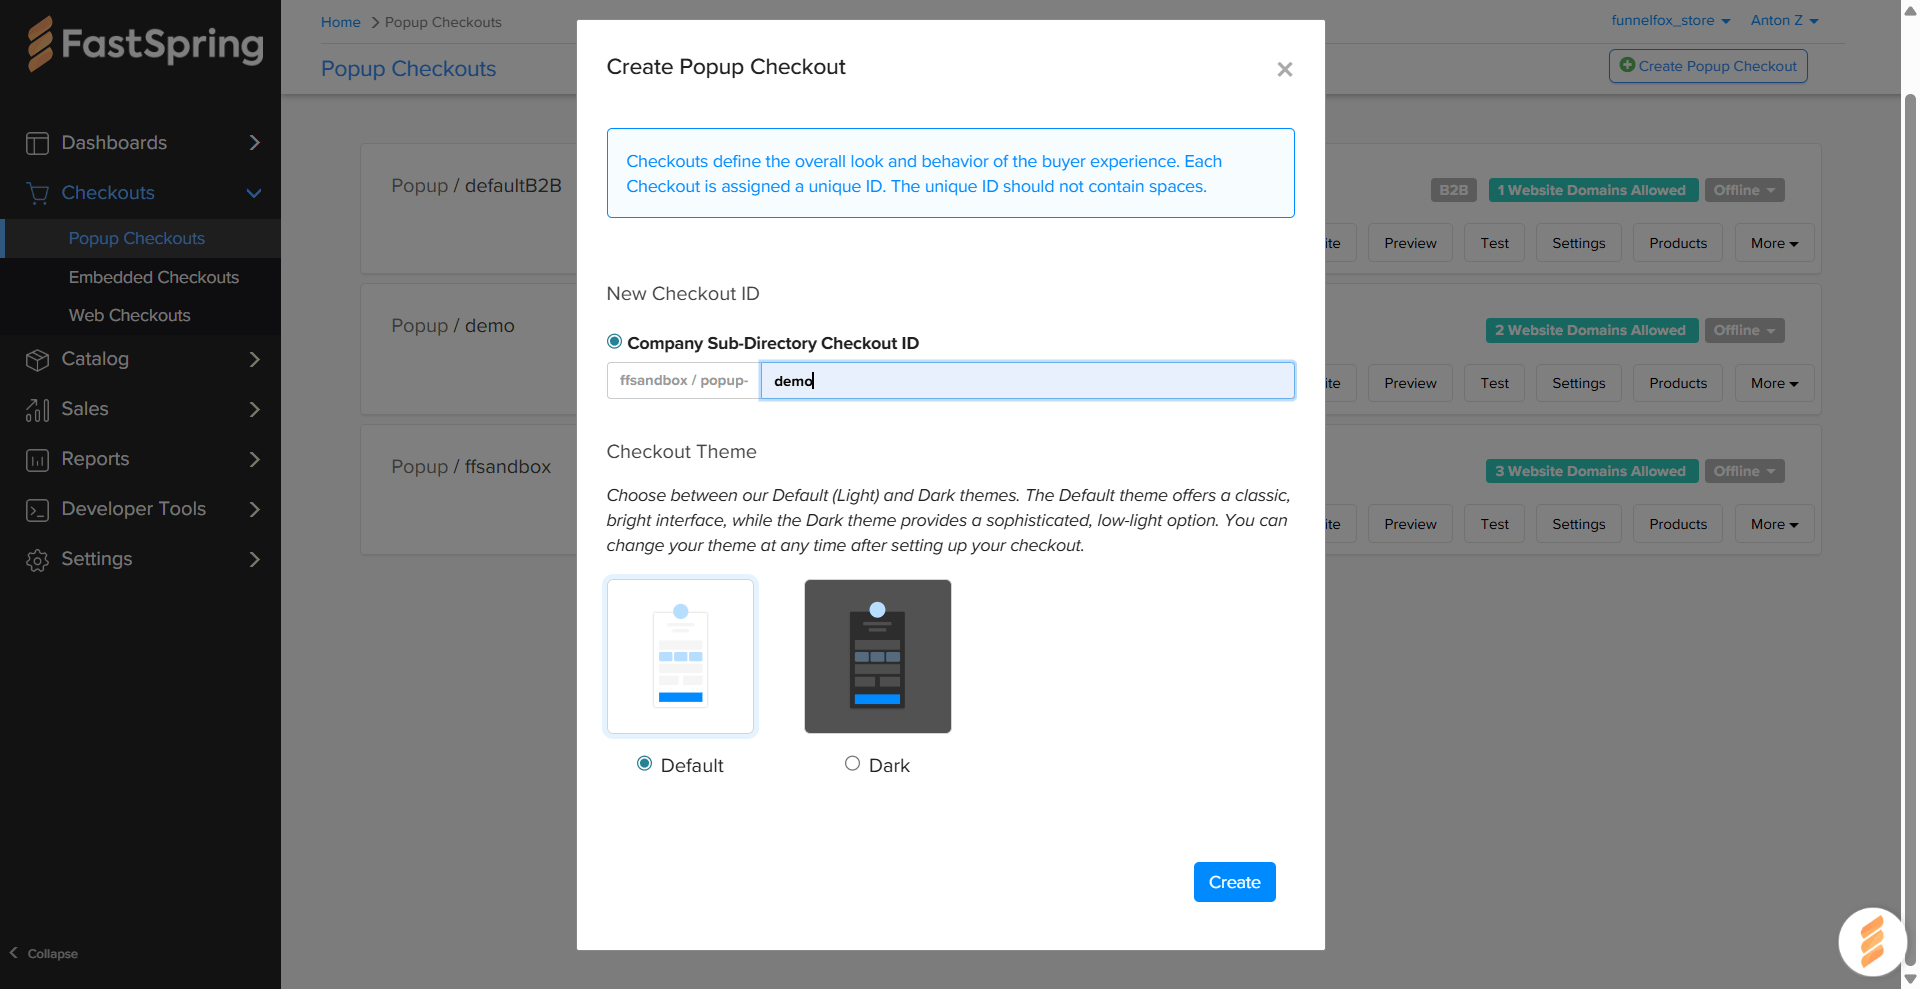
 3. Enter a unique ID for your new checkout without spaces or special
characters. This ID becomes part of your checkout URL.
4. Click **Create**.
3. Enter a unique ID for your new checkout without spaces or special
characters. This ID becomes part of your checkout URL.
4. Click **Create**.
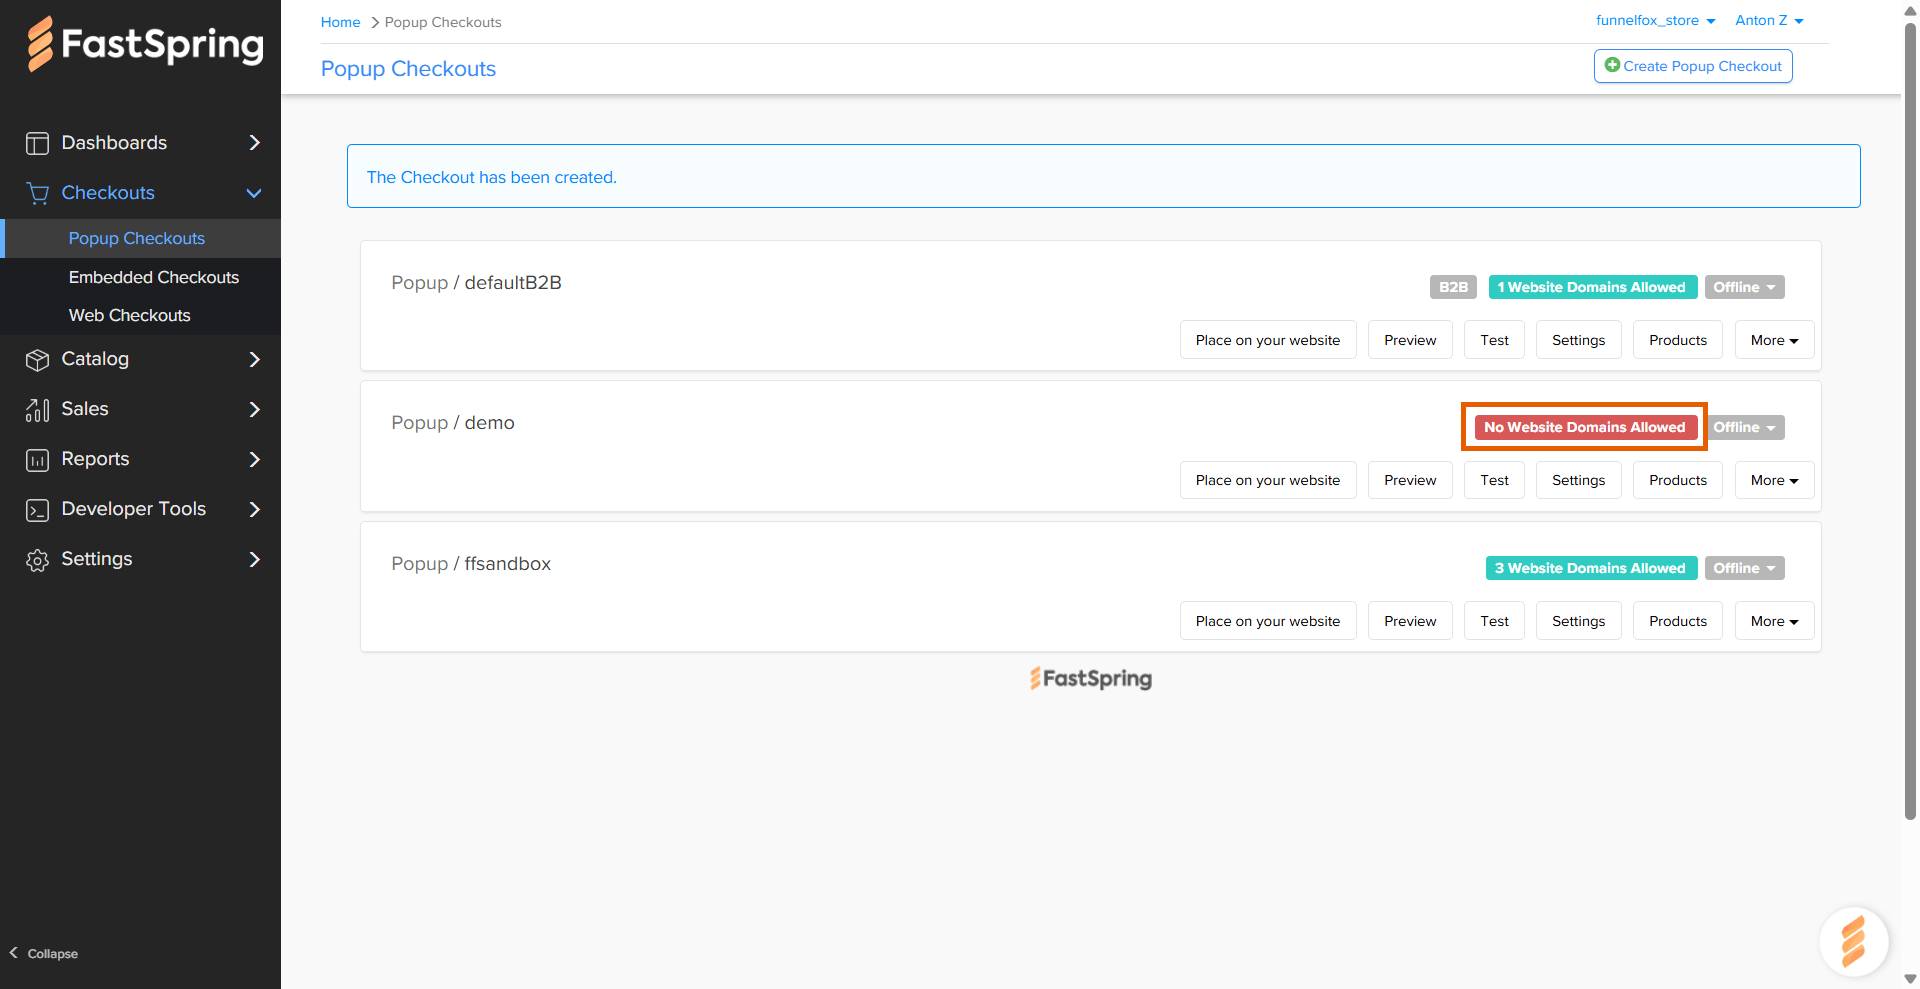
 5. Click **No Website Domains Allowed** badge on the checkout you just created.
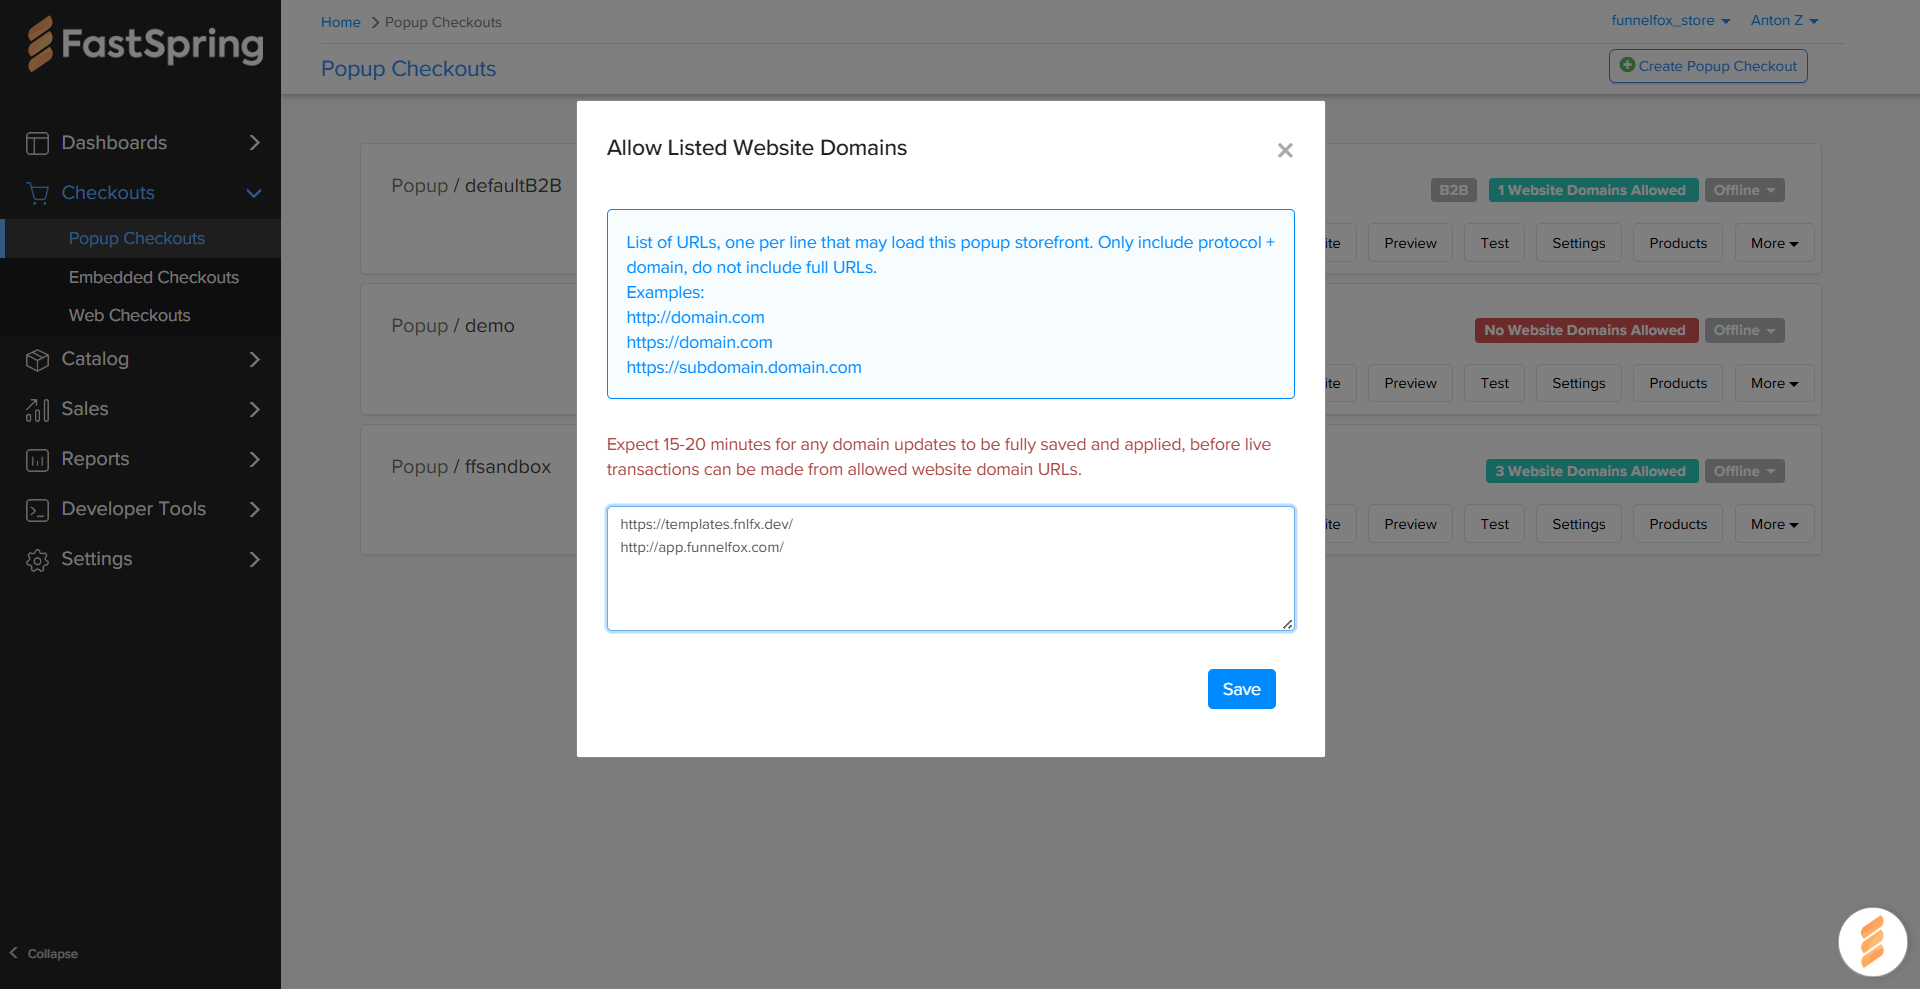
 6. Paste the following domains and click **Save**:
* Your project domain from
[Settings > Domains](https://app.funnelfox.com/settings/domains)
in FunnelFox.
* `http://app.funnelfox.com/` to use your checkout in funnel preview
mode.
* If you have a custom domain, add it as well.
6. Paste the following domains and click **Save**:
* Your project domain from
[Settings > Domains](https://app.funnelfox.com/settings/domains)
in FunnelFox.
* `http://app.funnelfox.com/` to use your checkout in funnel preview
mode.
* If you have a custom domain, add it as well.
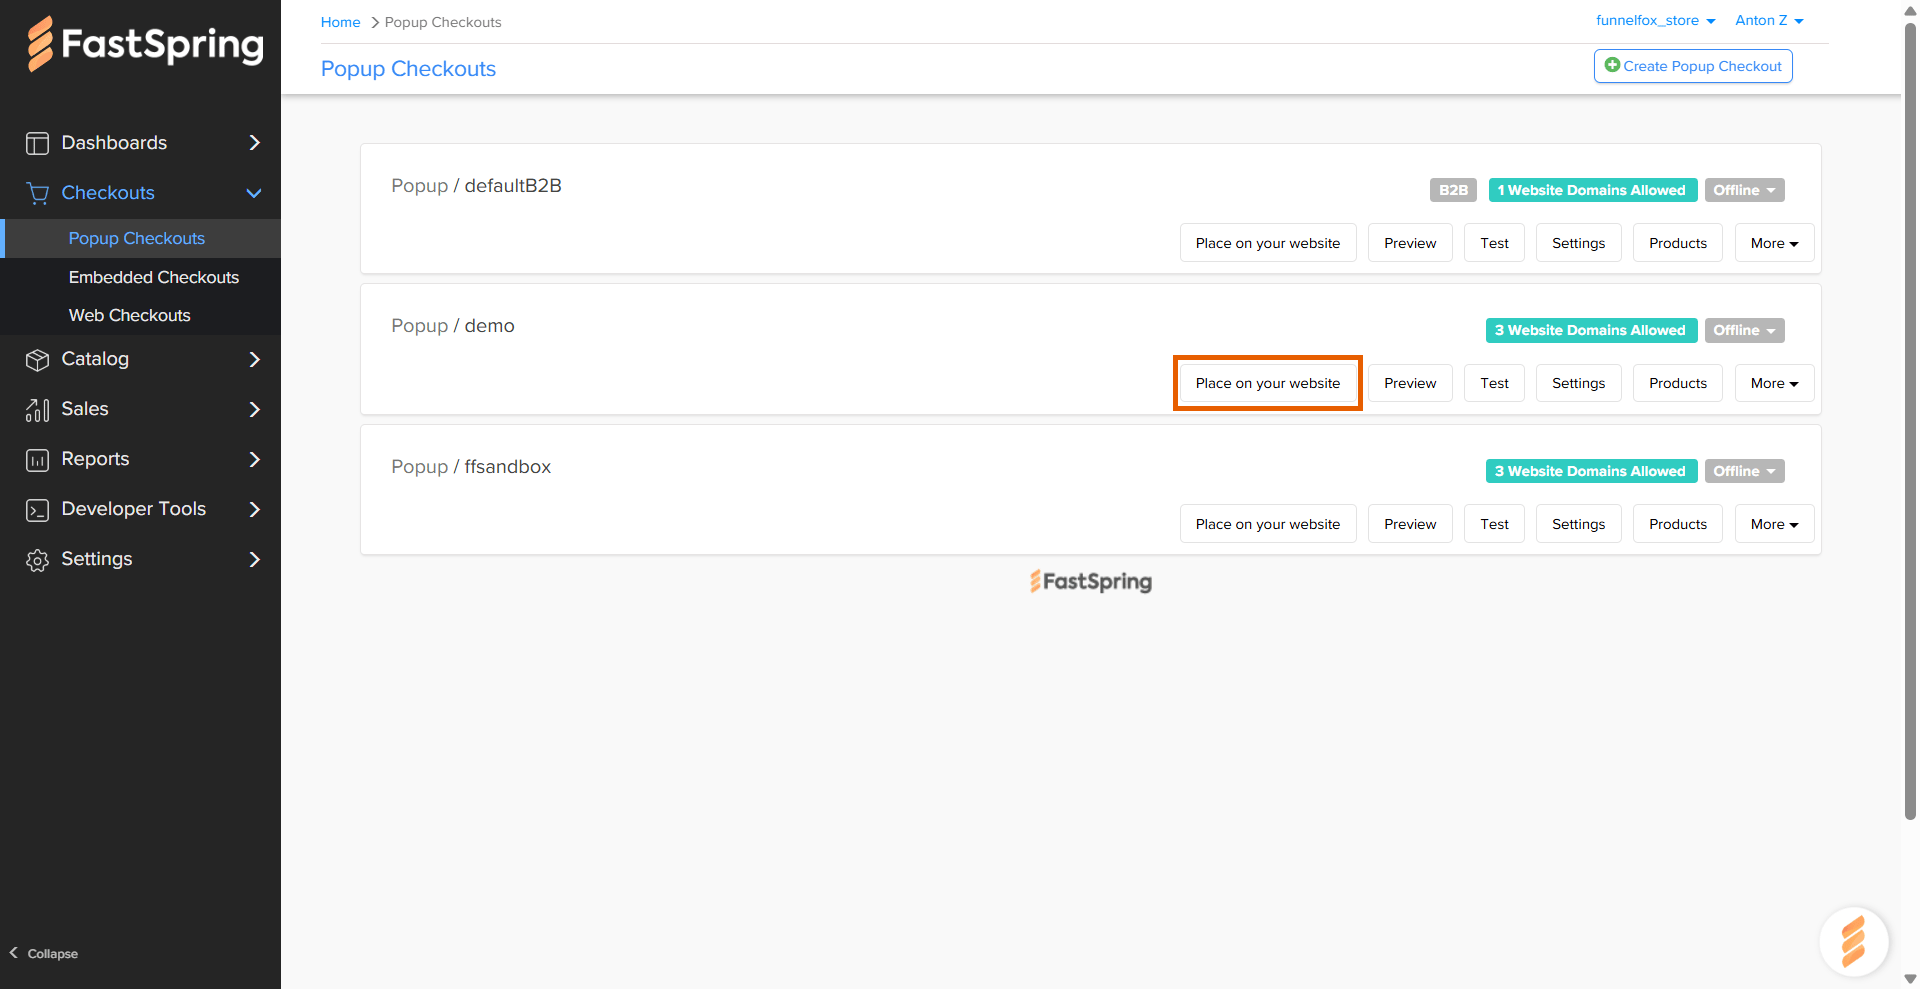
 7. Click **Place on your website** on the checkout you just created.
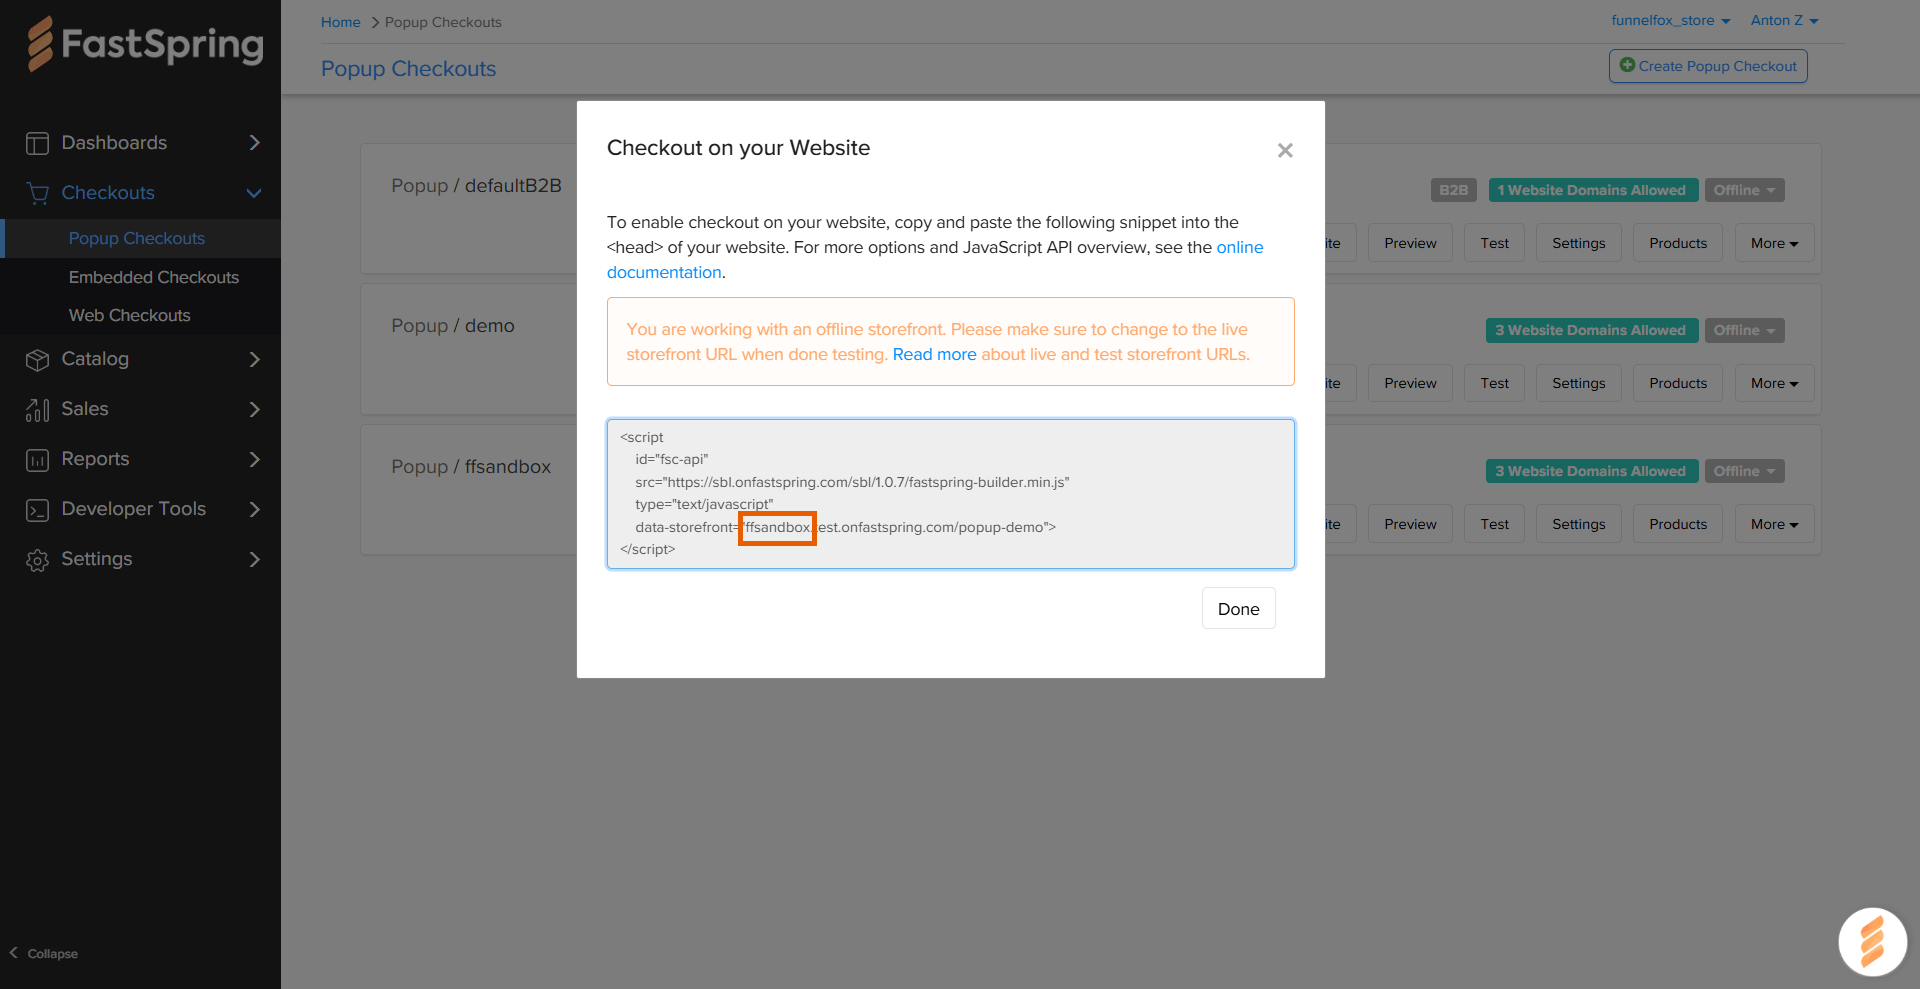
 8. Copy your account subdomain from: `data-storefront="YOUR_ACCOUNT_SUBDOMAIN.test.onfastspring.com/popup-demo"`.
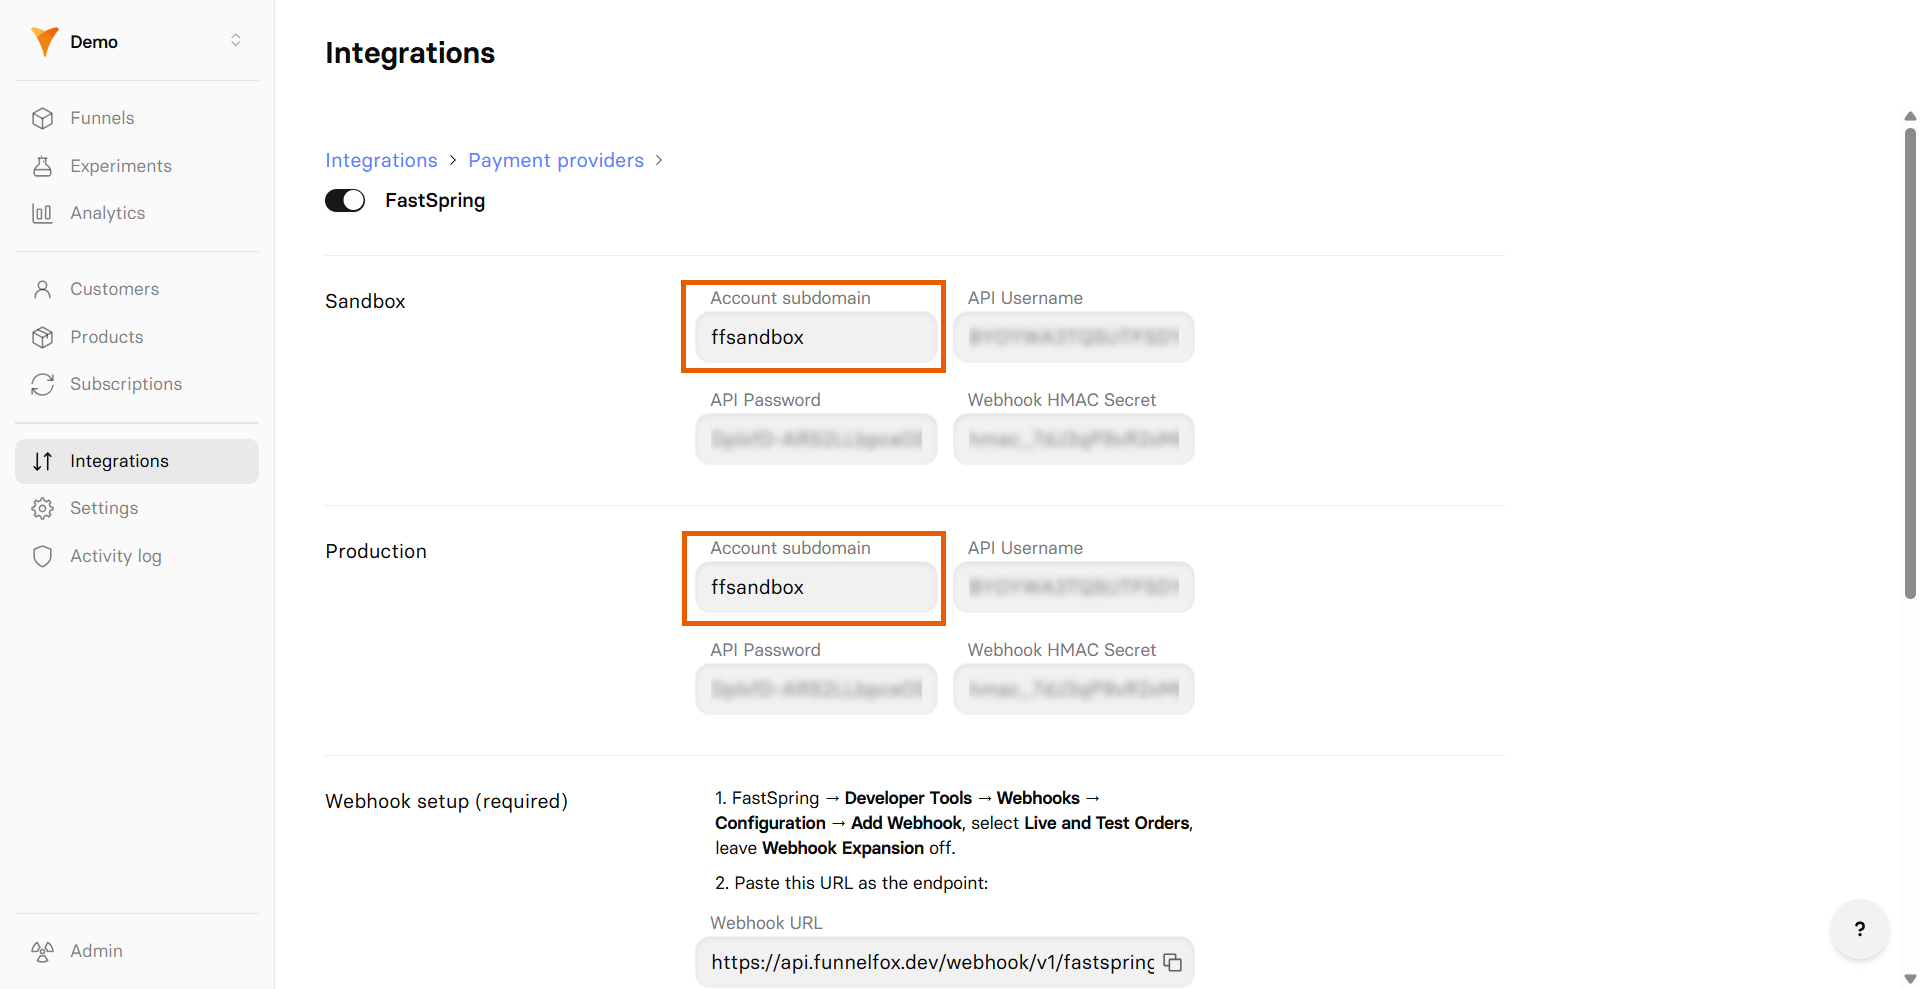
 9. Go back to FunnelFox and paste your checkout ID into the
**Account subdomain** and **Account subdomain (sandbox)** fields.
9. Go back to FunnelFox and paste your checkout ID into the
**Account subdomain** and **Account subdomain (sandbox)** fields.
 10. Click **Save changes**.
Your FastSpring integration is now active! Remember to republish your funnels to apply the changes.
### 4. Upsells
Complete this step if you want one-click upsells to
work in your funnels.
1. Generate a public certificate and private key in your terminal.
1) Open Terminal on your device.
2) Generate a private key:
```bash theme={null}
openssl genrsa -out privatekey.pem 2048
```
3. Create a certificate:
```bash theme={null}
openssl req -new -x509 -key privatekey.pem -out publiccert.pem -days 3650 -subj "/CN=funnelfox"
```
4. Copy the contents of `privatekey.pem` to your clipboard:
* macOS: `pbcopy < privatekey.pem`
* Windows PowerShell: `Get-Content privatekey.pem | Set-Clipboard`
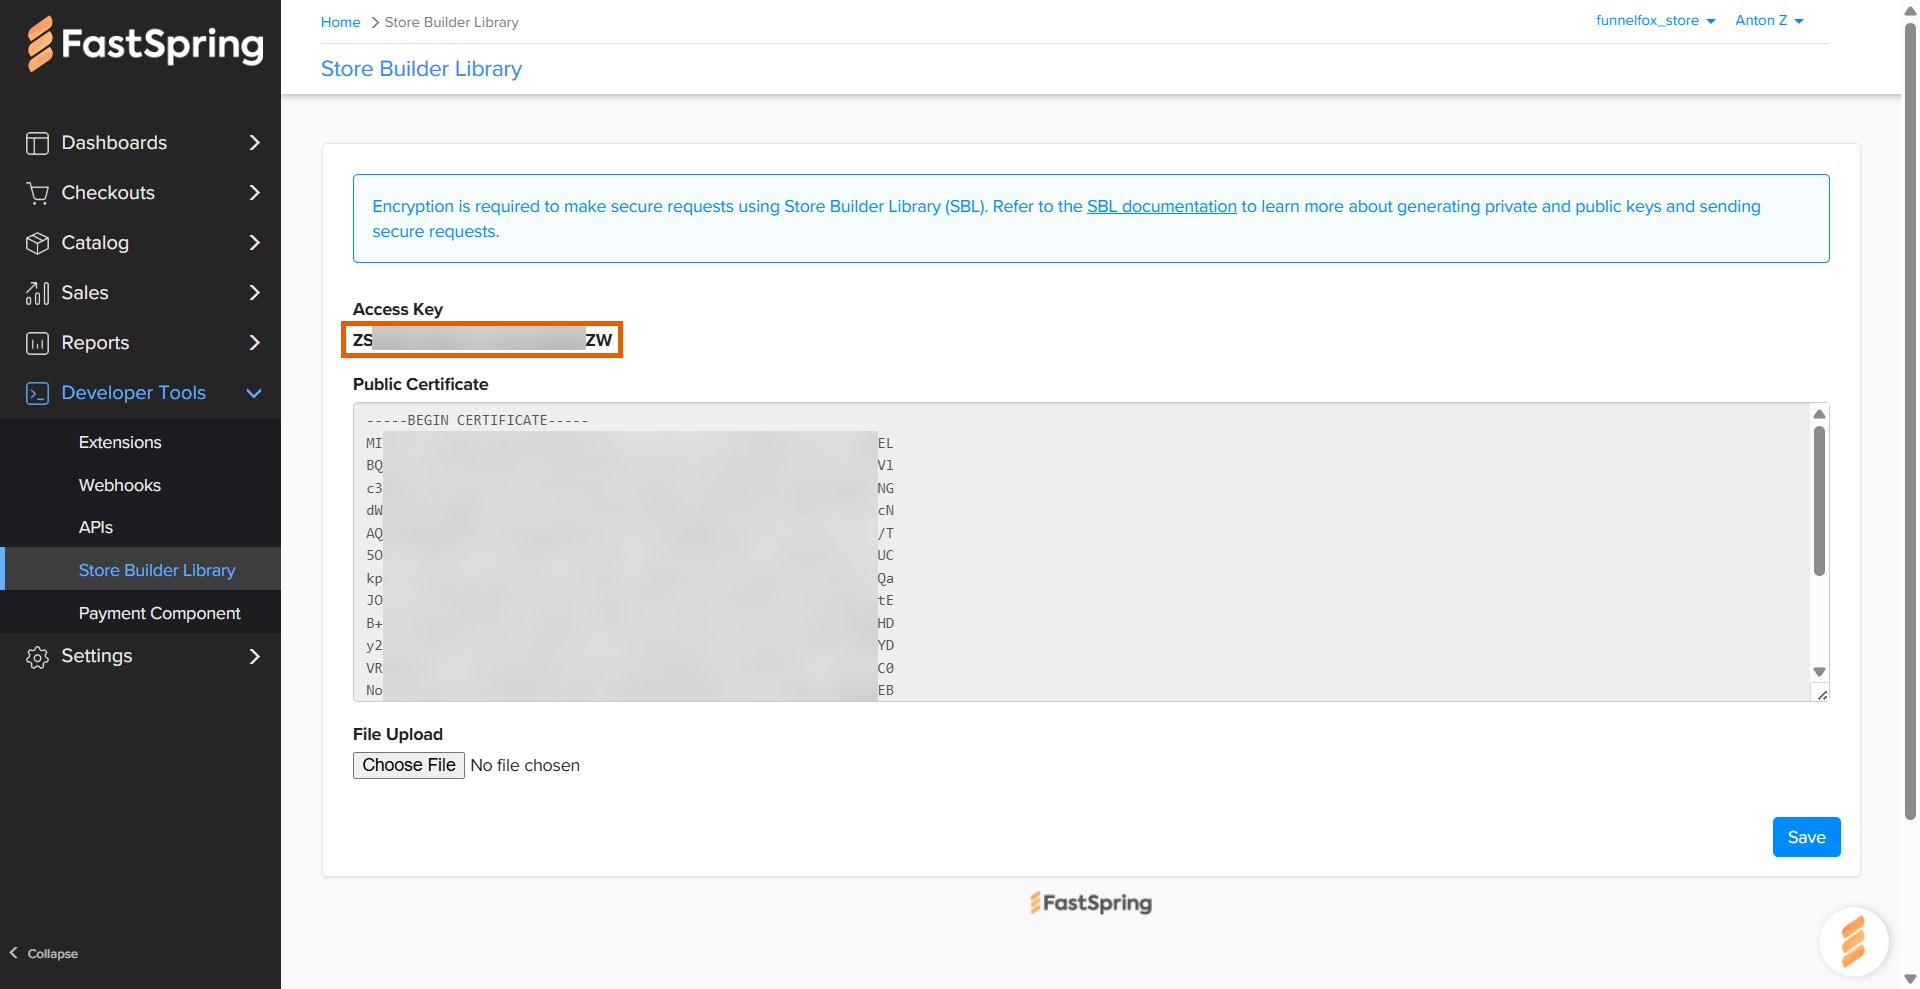
2. Go to **Developer Tools > Store Builder Library** in
[FastSpring](https://app.fastspring.com/).
3. Copy the **Access key**.
10. Click **Save changes**.
Your FastSpring integration is now active! Remember to republish your funnels to apply the changes.
### 4. Upsells
Complete this step if you want one-click upsells to
work in your funnels.
1. Generate a public certificate and private key in your terminal.
1) Open Terminal on your device.
2) Generate a private key:
```bash theme={null}
openssl genrsa -out privatekey.pem 2048
```
3. Create a certificate:
```bash theme={null}
openssl req -new -x509 -key privatekey.pem -out publiccert.pem -days 3650 -subj "/CN=funnelfox"
```
4. Copy the contents of `privatekey.pem` to your clipboard:
* macOS: `pbcopy < privatekey.pem`
* Windows PowerShell: `Get-Content privatekey.pem | Set-Clipboard`
2. Go to **Developer Tools > Store Builder Library** in
[FastSpring](https://app.fastspring.com/).
3. Copy the **Access key**.
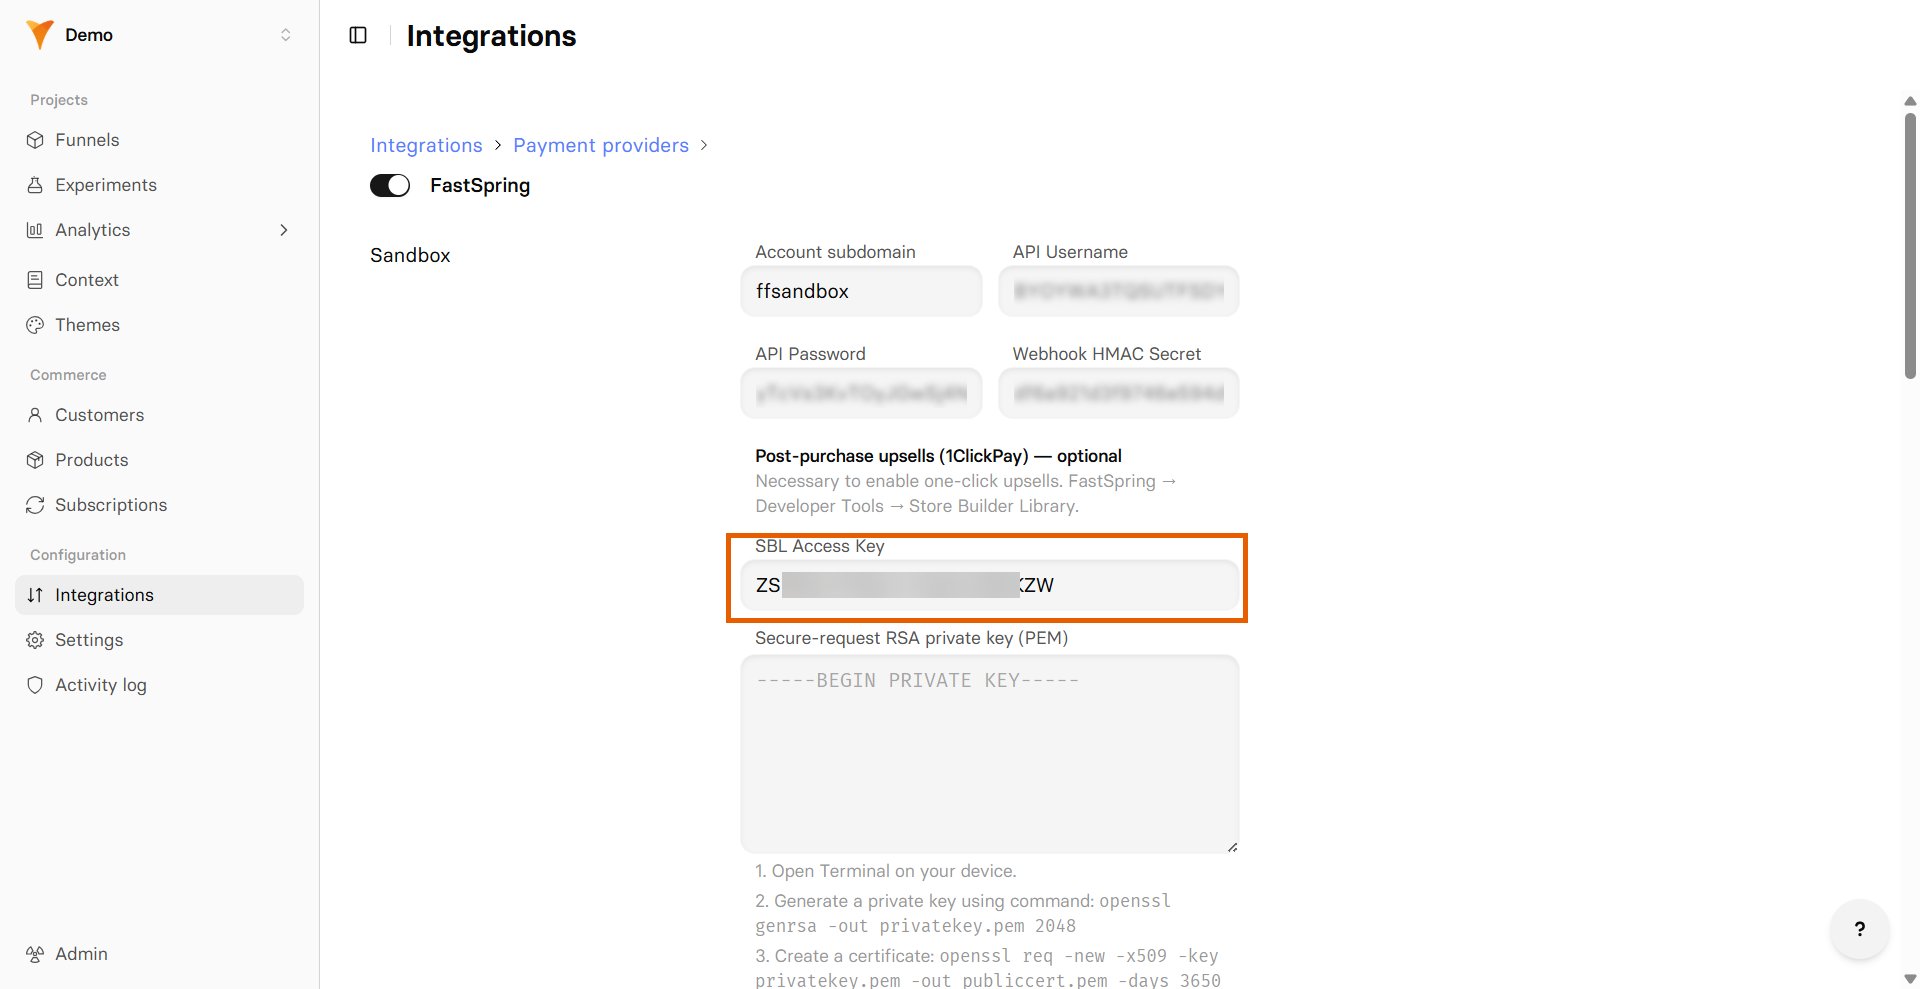
 4. Go to **Integrations > FastSpring** in FunnelFox.
5. Paste the key into the **SBL Access Key** field.
4. Go to **Integrations > FastSpring** in FunnelFox.
5. Paste the key into the **SBL Access Key** field.
 6. Go back to FastSpring and upload your `publiccert.pem` as the
**Public certificate**.
6. Go back to FastSpring and upload your `publiccert.pem` as the
**Public certificate**.
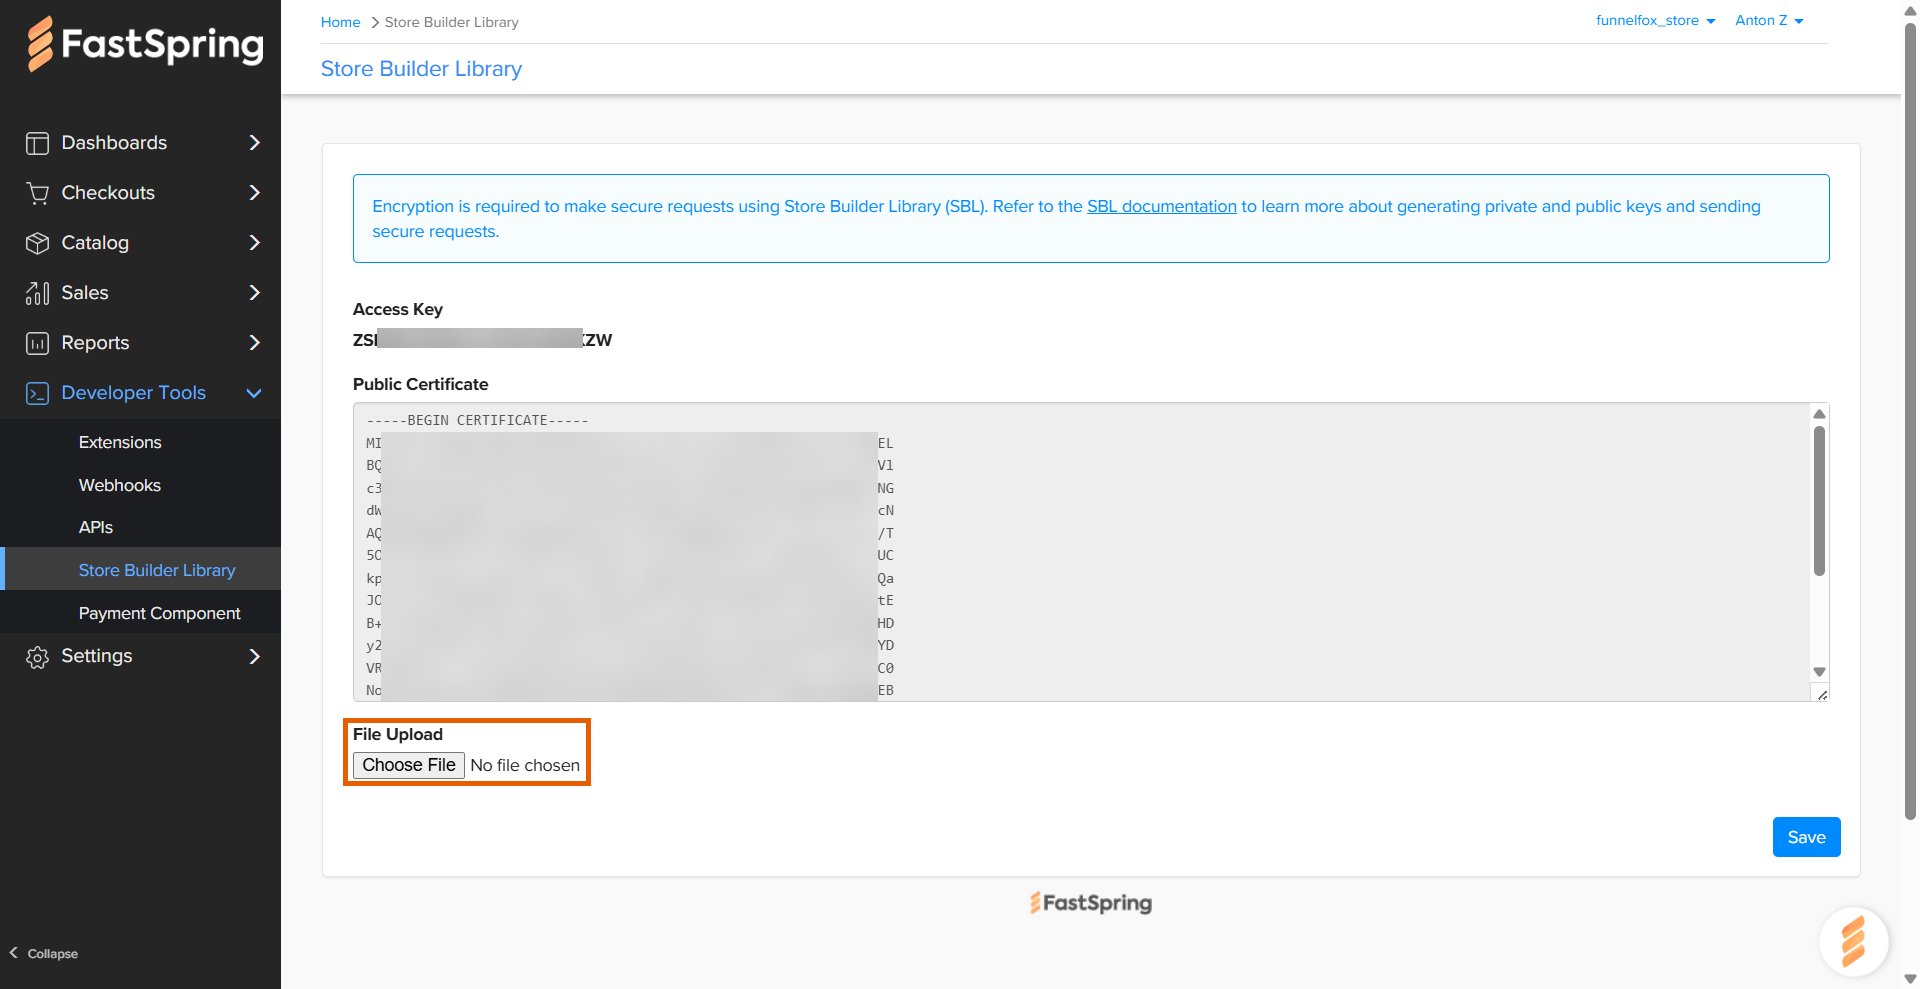 7. Save changes in FastSpring.
8. Paste the contents of `privatekey.pem` into the **Secure-request RSA
private key (PEM)** field in FunnelFox.
7. Save changes in FastSpring.
8. Paste the contents of `privatekey.pem` into the **Secure-request RSA
private key (PEM)** field in FunnelFox.
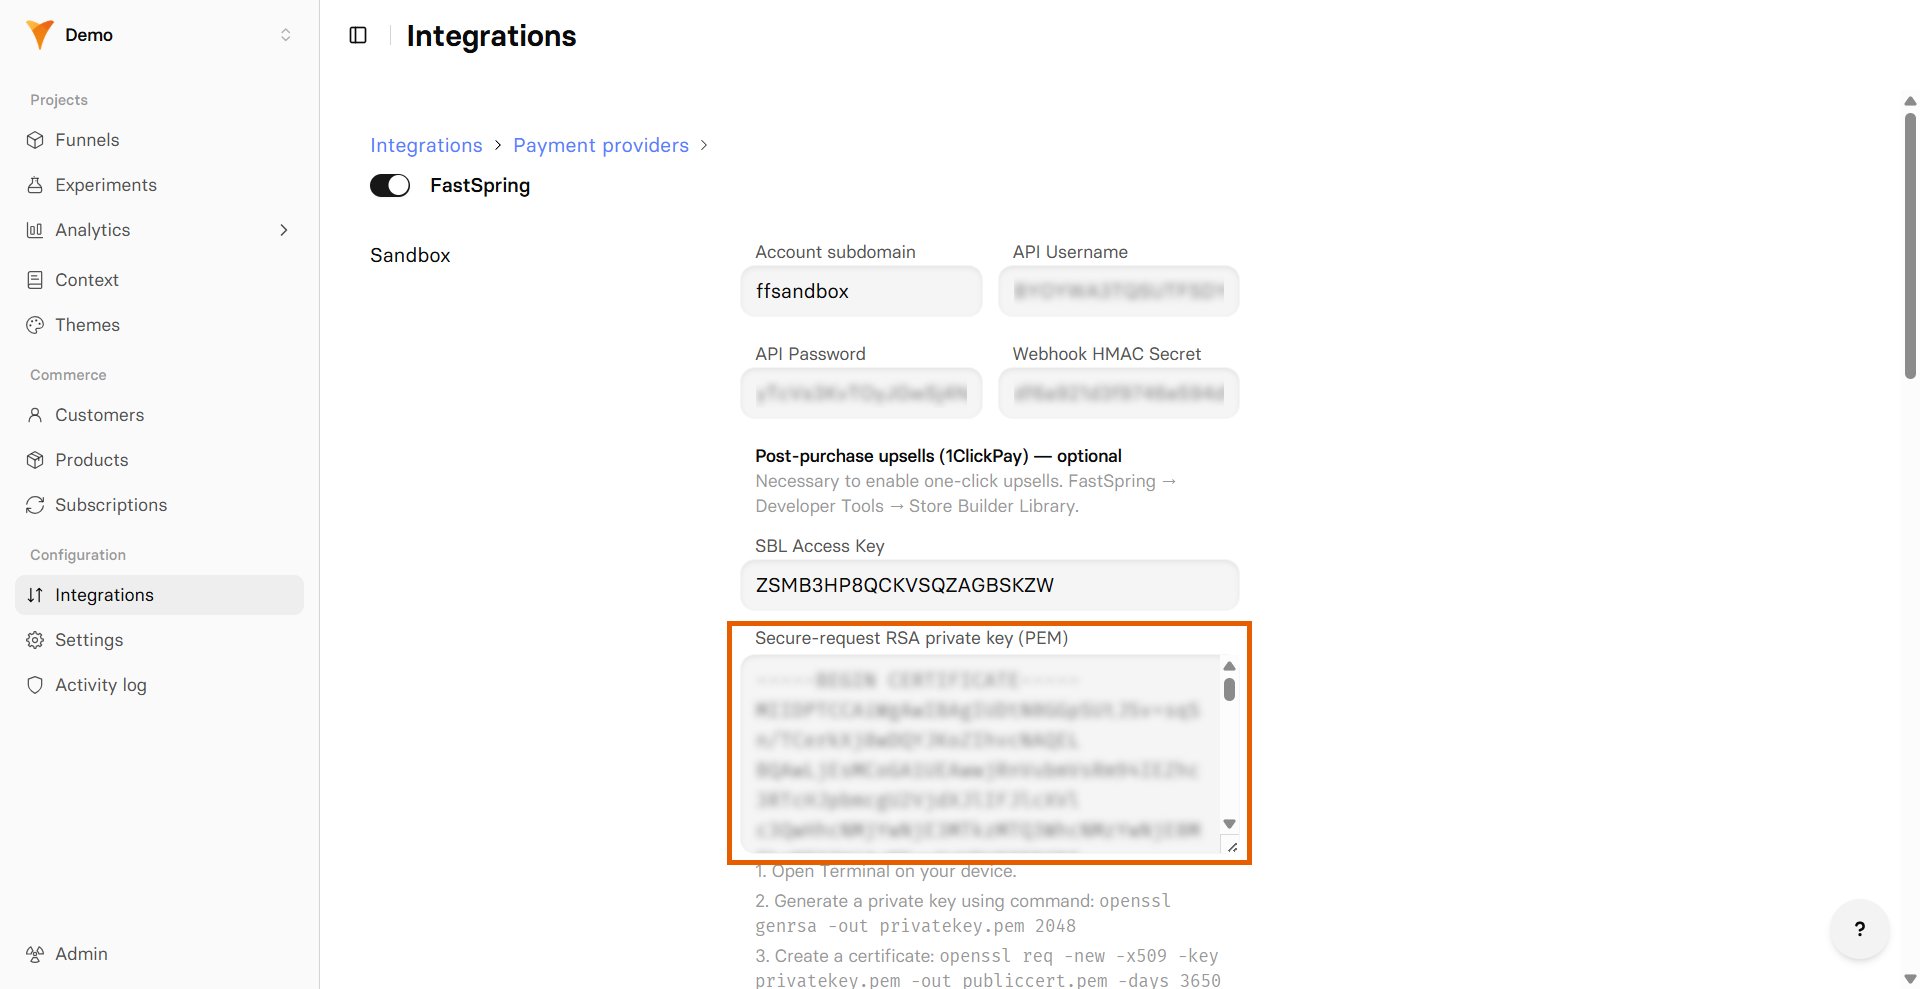 9. Repeat under the **Production** section and click **Save changes**.
One-click upsells are now enabled. Remember to republish your
funnels to apply the changes.
## Checkout types
FunnelFox supports two FastSpring checkout types:
* **Popup**: A modal checkout that opens over your funnel.
* **Embedded**: A checkout embedded directly into your page layout.
Configure each checkout type before using it in the Editor:
1. Go to **Checkouts > Popup Checkouts / Embedded Checkouts** in FastSpring.
2. Create new checkout of the type needed.
3. Click **No Website Domains Allowed** badge on the checkout you just created.
4. Paste the following domains and click **Save**:
* Your project domain from
[Settings > Domains](https://app.funnelfox.com/settings/domains)
in FunnelFox.
* `http://app.funnelfox.com/` to use your checkout in funnel preview
mode.
* If you have a custom domain, add it as well.
## Subscription configuration
Due to FastSpring limitation, you need to collect customer email before the paywall screen with Checkout element. Add an Email input before configuring products.
After setup, FunnelFox automatically creates webhooks in your FastSpring
account and syncs your products.
To make each FastSpring product available in the Checkout element, you need:
* **Checkout ID**: Go to **Checkouts > Popup Checkouts / Embedded Checkouts** in FastSpring and copy the ID of the checkout to configure (e.g. `Popup / YOUR_CHECKOUT_ID`).
9. Repeat under the **Production** section and click **Save changes**.
One-click upsells are now enabled. Remember to republish your
funnels to apply the changes.
## Checkout types
FunnelFox supports two FastSpring checkout types:
* **Popup**: A modal checkout that opens over your funnel.
* **Embedded**: A checkout embedded directly into your page layout.
Configure each checkout type before using it in the Editor:
1. Go to **Checkouts > Popup Checkouts / Embedded Checkouts** in FastSpring.
2. Create new checkout of the type needed.
3. Click **No Website Domains Allowed** badge on the checkout you just created.
4. Paste the following domains and click **Save**:
* Your project domain from
[Settings > Domains](https://app.funnelfox.com/settings/domains)
in FunnelFox.
* `http://app.funnelfox.com/` to use your checkout in funnel preview
mode.
* If you have a custom domain, add it as well.
## Subscription configuration
Due to FastSpring limitation, you need to collect customer email before the paywall screen with Checkout element. Add an Email input before configuring products.
After setup, FunnelFox automatically creates webhooks in your FastSpring
account and syncs your products.
To make each FastSpring product available in the Checkout element, you need:
* **Checkout ID**: Go to **Checkouts > Popup Checkouts / Embedded Checkouts** in FastSpring and copy the ID of the checkout to configure (e.g. `Popup / YOUR_CHECKOUT_ID`).
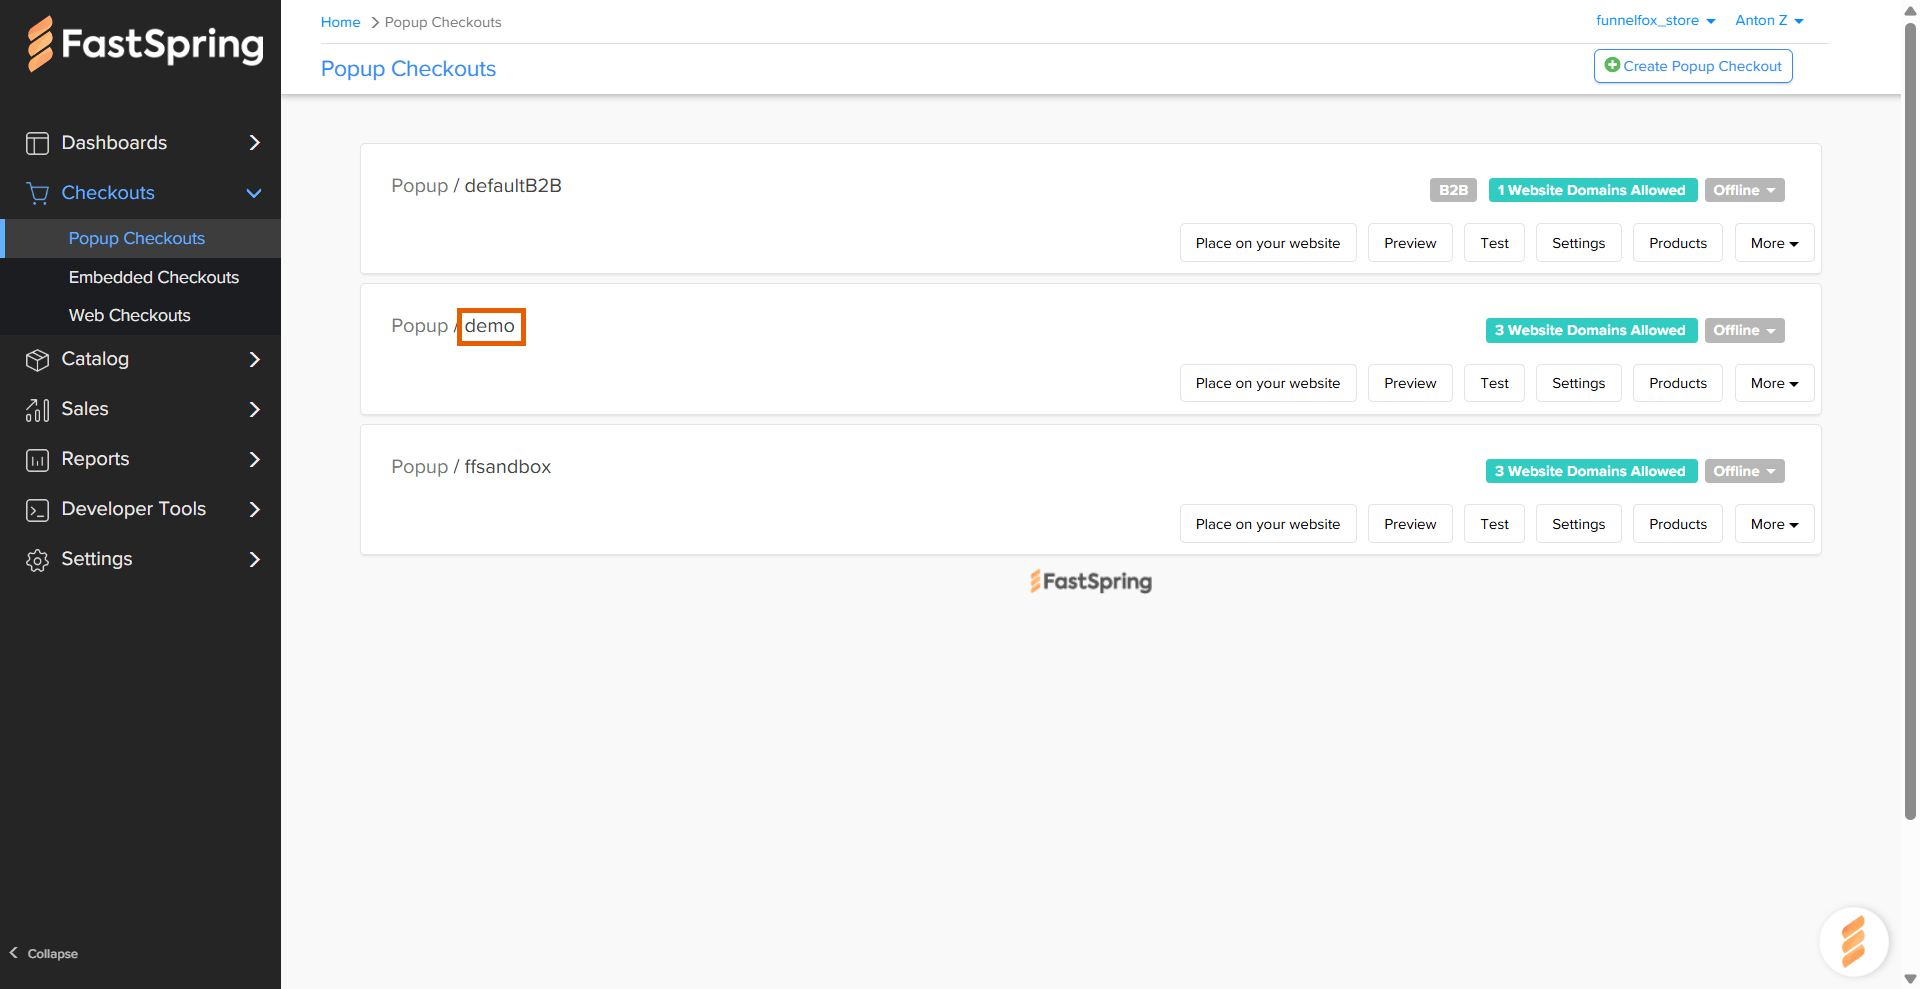 * **Product path**: Go to **Catalog > Subscription Plans** in FastSpring and copy the path of product to configure.
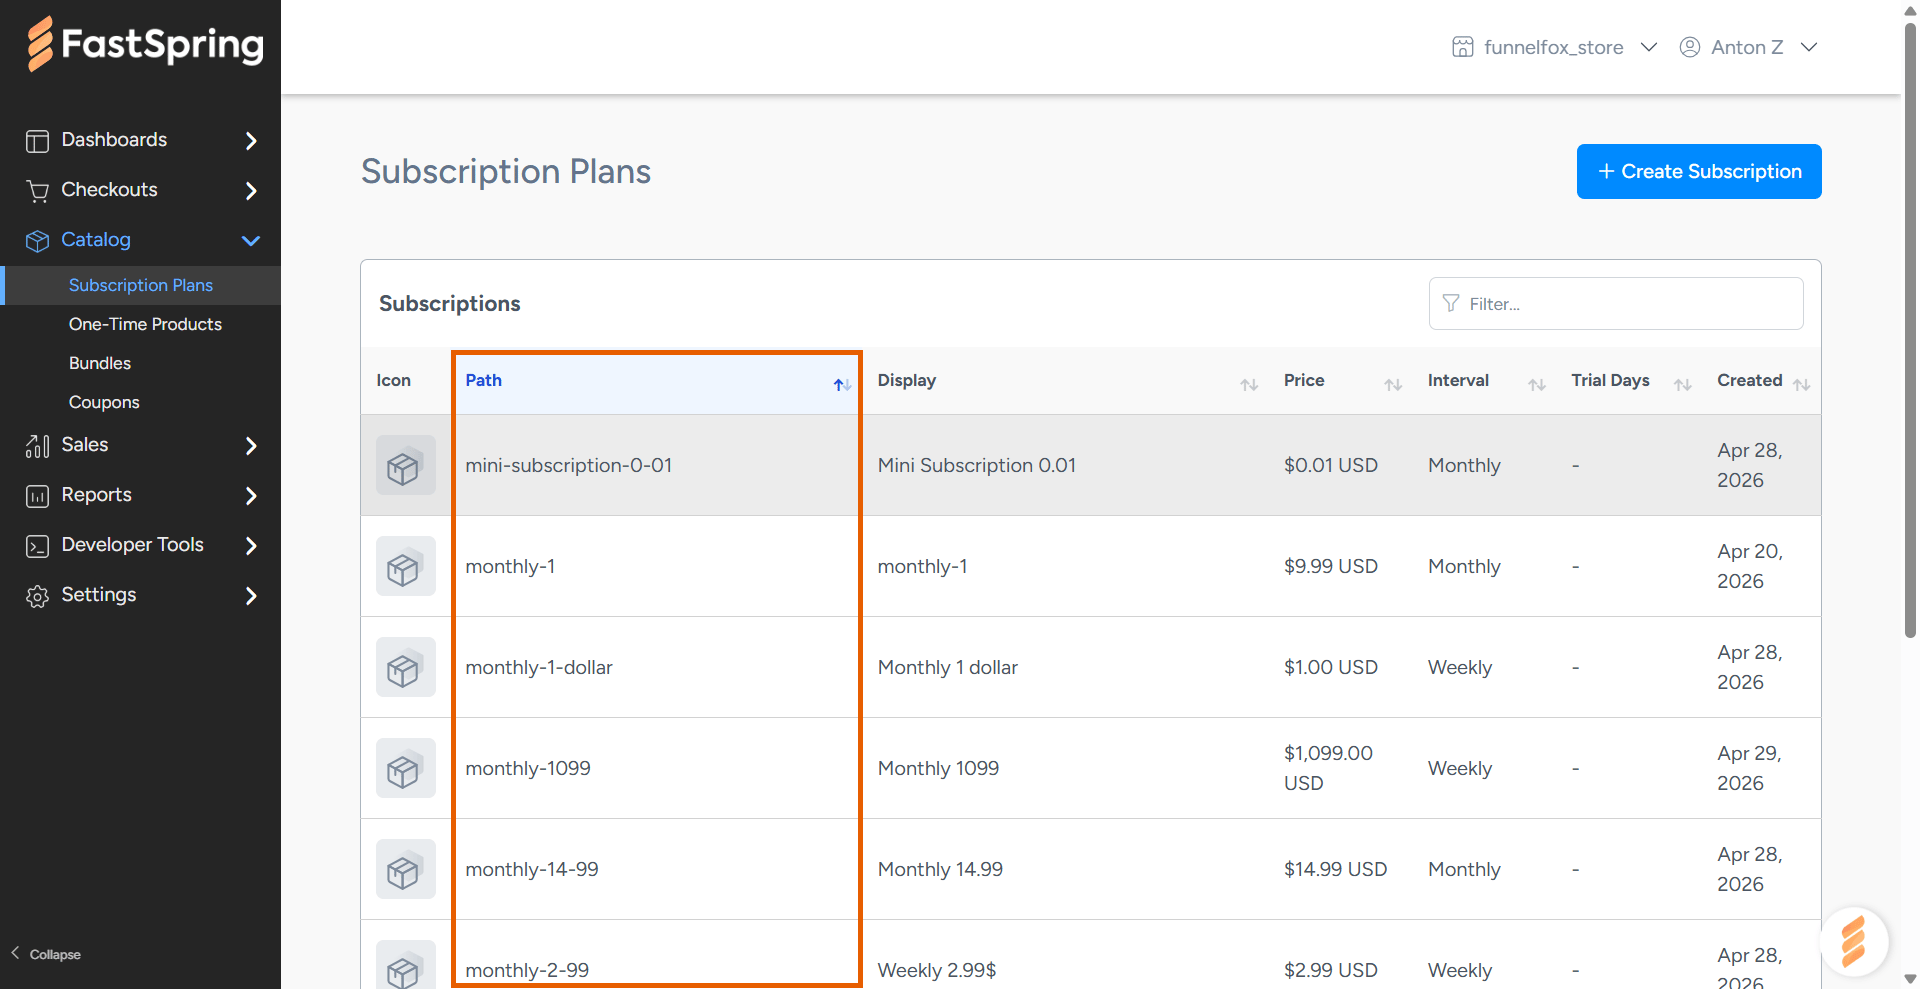 Use the Checkout ID and Product path values to proceed with product configuration in your [Checkout element](/docs/elements/checkout#subscription-configuration).
## Testing
Test your FastSpring integration with simulated payments before going
live.
1. Configure the test in your Checkout element's **Sandbox** section.
2. Open your funnel in **Preview** mode.
3. Use these FastSpring test cards with any future expiry date and the CVV from the product page in FastSpring:
| Card Number | Result |
| ------------------- | --------------- |
| 4242 4242 4242 4242 | Success |
| 4000 0000 0000 0002 | Generic decline |
## Next steps
* [Set up checkout element](/docs/elements/checkout) in your funnel
Use the Checkout ID and Product path values to proceed with product configuration in your [Checkout element](/docs/elements/checkout#subscription-configuration).
## Testing
Test your FastSpring integration with simulated payments before going
live.
1. Configure the test in your Checkout element's **Sandbox** section.
2. Open your funnel in **Preview** mode.
3. Use these FastSpring test cards with any future expiry date and the CVV from the product page in FastSpring:
| Card Number | Result |
| ------------------- | --------------- |
| 4242 4242 4242 4242 | Success |
| 4000 0000 0000 0002 | Generic decline |
## Next steps
* [Set up checkout element](/docs/elements/checkout) in your funnel